First Aid Cold

Colds :

What are colds:

Everyone gets a cold from time to time. Children get more colds than adults.

Colds usually last 1 to 2 weeks. You can catch a cold at any time of year, but they are more common in late winter and early spring.

There is no cure for a cold. Antibiotics will not cure a cold. If you catch a cold, treat the symptoms.

What are the symptoms:

Lots of different viruses cause colds, but the symptoms are usually the same:

  • Runny nose and sneezing
  • Red eyes
  • Sore throat and cough
  • Headaches and body aches

You will probably feel a cold come on over the course of a couple of days. As the cold gets worse, your nose may get stuffy with thicker mucus.

A cold is not the same as the flu (influenza). Flu symptoms are worse and come on faster. If you have the flu, you may feel very tired. You may also have a fever and shaking chills, lots of aches and pains, a headache, and a cough.

If you feel like you have a cold all the time, or if cold symptoms last more than 2 weeks, you may have allergies or sinusitis. Call your doctor.

What can you do for a cold:

Good home treatment of a cold can help you feel better. When you get a cold:

  • Get extra rest. Slow down just a little from your usual routine. You don’t need to stay home in bed, but try not to expose others to your cold.
  • Drink plenty of fluids. Hot water, herbal tea, or chicken soup will help relieve a stuffy nose and head.
  • Take aspirin, ibuprofen (such as Advil or Motrin), or acetaminophen (such as Tylenol) to relieve aches. Follow the package instructions carefully. If you give medicine to your child, follow what your doctor has told you about the amount to give. Do not give aspirin to anyone younger than 20. It has been linked to Reye syndrome, a serious illness.
  • Use a humidifier in your bedroom and take hot showers to relieve a stuffy nose and head. Saline drops may also help thick or dried mucus to drain.
  • If you feel mucus in the back of your throat (postnasal drip), gargle with warm water. This will help make your throat feel better.
  • Use paper tissues, not handkerchiefs. This will help keep your cold from spreading.
  • If your nose gets red and raw, put a dab of petroleum jelly on the sore area.

reg_temp_human

How can you prevent colds:

There are several things you can do to help prevent colds:

  • Wash your hands often.
  • Be extra careful in winter and when you are around people with colds.
  • Keep your hands away from your face. Your nose, eyes, and mouth are the most likely places for germs to enter your body.
  • Eat well, and get plenty of sleep and exercise. This keeps your body strong so it can fight colds.
  • Do not smoke. Smoking makes it easier to get a cold and harder to get rid of one.

First Aid Chemical Burns

First aid : Chemical burns

Chemical Burns Overview

A chemical burn is irritation and destruction of human tissue caused by exposure to a chemical, usually by direct contact with the chemical or its fumes. Chemical burns can occur in the home, at work or school, or as a result of accident or assault. Although few people in the United States die after contact with chemicals in the home, many substances common in both living and storage areas can do serious harm.

Many chemical burns occur accidentally through misuse of products such as those for hair, skin, and nail care. Although injuries do occur at home, the risk of sustaining a chemical burn is much greater in the workplace, especially in businesses and manufacturing plants that use large quantities of chemicals.

Most chemical burns are caused by either strong acids or strong bases (for example, hydrochloric acid or sodium hydroxide). Acids damage and kill cells by coagulating cells while bases liquefy cells. Prolonged exposure can severely damage human tissues and, if the patient survives, leads to scarring and disability. Other chemicals like oxidants and certain metals may also produce similar chemical burns. Limiting the time of exposure to any of these chemicals can greatly reduce their damaging effects.

Chemical Burn Causes

Most chemicals that cause burns are either strong acids or bases. A glance at the medical information on the labels of dangerous chemicals usually confirms the expected toxicity. Common sense precautions and consumer education can reduce the risk of injury. A variety of common household products that may cause chemical burns are as follows:

  • Bleach
  • Concrete mix
  • Drain or toilet bowl cleaners
  • Metal cleaners
  • Pool chlorinates

Chemical Burn Symptoms

All chemical burns should be considered potential medical emergencies.

Most chemical burns occur on the face, eyes, hands, arms, and legs. Usually a chemical burn will be relatively small and will require only outpatient treatment. Chemical burns can be deceiving, however. Some agents can cause deep tissue damage that is not not readily apparent when people first look at it.

Tissue damage from chemical burns depends on several factors.

  • The strength or concentration of the agent
  • The site of contact (eye, skin, mucous membrane)
  • Whether swallowed or inhaled
  • Whether or not skin is intact
  • With the quantity of the chemical
  • The duration of exposure
  • How the chemical works
  • The length of time to washing (decontamination)

Signs and symptoms of chemical burns include the following:

  • Redness, irritation, or burning at the site of contact
  • Pain or numbness at the site of contact
  • Formation of blisters or black dead skin at the contact site
  • Vision changes if the chemical gets into the eyes
  • Cough or shortness of breath
  • Vomiting

In severe cases, a person may develop any of the following symptoms:

  • Low blood pressure
  • Faintness, weakness, dizziness
  • Shortness of breath or severe cough
  • Headache
  • Muscle twitching or seizures
  • Cardiac arrest or irregular heartbeat

When to Seek Medical Care

Once all immediate danger has passed and the person has completed basic first aid (removed from the chemical source, contaminated clothing removed, and, if skin or eyes involved, extensive rinsing with water in most situations), a doctor, if immediately available, should review the injury and the chemical involved to make sure the patient needs no further emergency treatment. If a potential problem remains, the doctor can arrange appropriate treatment or will direct the patient to go to a hospital’s Emergency Department.

Emergency personnel are trained to assess the extent of a chemical burn, begin treatment, and transport victims to the most appropriate hospital.

Emergency officials also may determine the need for more involved decontamination of both the patient and the accident site prior to going to the hospital. It is possible that the patient needs further decontamination before arriving at the hospital. As much of the following information as possible needs to be related to the call dispatcher:

  • Number and location of the injured person or people
  • Mechanism or nature of injury (how it happened)
  • Whether emergency personnel can reach the victims (are victims trapped?)
  • Name, strength, and volume or quantity of the chemical causing the burn (give a container or its label of the chemical to emergency personnel, if possible)
  • Length of time of contact with the chemical

Chemical Burn Treatment

Most people with minor chemical burns do not need to be admitted. Most can go home after arranging follow-up care with a doctor. Patients with major chemical burns however, need to be admitted to a hospital. Ingestion or inhalation of chemical burns may need to be admitted for observation, depending on the potential severity of tissue damage.

Chemical Burns Self-Care at Home

Begin basic first aid. Immediately call emergency number if a person has a severe injury, any shortness of breath,chest pain, dizziness, or other symptoms throughout the body. If are aiding an injured person with these symptoms, lay the person down and immediately call emergency number. Protect yourself and make sure that you are not exposing yourself to the same chemical.

  • Remove yourself or the injured person from the accident or exposure area. Take appropriate care not to cause further injury to the patient.
  • Remove any contaminated clothing.
  • Wash the injured area to dilute or remove the substance, using large volumes of water. Wash for at least 20 minutes, taking care not to allow runoff to contact unaffected parts of anyone’s body. Gently brush away any solid materials, again avoiding unaffected body surfaces.
  • Especially wash away any chemical in the eyes. Sometimes the best way to get large amounts of water to the eyes is to take a shower. If there is an eye wash station nearby (usually fond at work sites), follow the simple instructions to rinse out the eyes.

Rinse and Clear Burn Area

  • Flood area with cool water for at least 20 minutes or until help arrives.
  • Make sure water doesn’t flow onto another part of the person’s body or onto you.
  • Don’t use a strong stream of water, if possible.
  • As you flush the burn (not before), remove jewelry or articles of clothing with chemical on them, unless they’re stuck to the person’s body.
  • After flushing the burn, follow instructions on the label of the chemical product, if available.
  • Don’t try to neutralize the burn with acid or alkali. This could cause a chemical reaction that worsens the burn.
  • Don’t put antibiotic ointment on the burn.

  Chemical burn of the skin   


Chemical burn of the eye

First aid video for chemical burn

First aid video for chemical burns

First Aid Bites

First aid : Bites

Many different types of animals ranging from dogs, cats, hamsters, raccoons, ferrets, and squirrels can bite adults and children. Many times, bites are from the family pet.

Most states require that animal bites be reported, therefore, the person bitten will be asked to fill out a form with information about the bite or asked specific questions for reporting purposes when medical care is sought. Aside from simple data collection, this can be important in cases of rabies cases to help officials track location(s) and monitor a possible spread of the disease.

Animal Bite Causes

Animal bites usually are either provoked or unprovoked. A provoked bite would occur if a person teases a dog or tries to take away the dog’s food while the dog is eating. An unprovoked bite may occur if the person are sitting in their backyard and a raccoon runs out of the woods and attacks them for no known reason. A stray dog that approaches a person and begins to bite them would be considered unprovoked. This type of information is very important to health care professional taking care of the bite beside in certain animal species “unprovoked” bites can be a sign or indicator that the animal has rabies and needs to be either captured, quarantined or very closely monitored.

Animal Bite First Aid

First aid should consist of getting away from the animal to a safe area. Next, apply pressure on the areas that are bleeding, and activate the call system or going to an emergency department if the injury requires care.

Animal Bite Symptoms

Although most bites need to be checked by a doctor, if the person who was bitten does not seek immediate attention after the bite has occurred, watch closely for signs and symptoms of infection. These symptoms may signal there is infection or debris still in the wound (such as teeth, clothes, or dirt):

  • Redness at or around the bite site
  • Swelling
  • Pus (thick) drainage from the wound
  • Increasing pain
  • Localized warmth at the bite site
  • Red streaks leading away from the site of the bite
  • Fever

When to Seek Medical Care

Most animal bites should be evaluated in a doctor’s office, at a walk-in clinic, or in a hospital’s emergency department for these reasons:

  • The risk of infection
  • Broken or embedded teeth (cats) or other foreign material in the wound (which will cause an infection)
  • Possible underlying nerve and blood vessel damage
  • Risk of tetanus if the person’s immunizations are not up to date
  • The consideration of risk of rabies, depending on the animal and circumstances of the bite

These types of bites pose the highest risk of infection and therefore require prompt evaluation:

  • Dog bites because of the crushing mechanism of the bite
  • Cat bites because of the puncture mechanism of the bite
  • Wild animal bites (from raccoons, for example) and dog or cat bites (pets may have themselves been bitten by stray animals) because of the risk of contracting rabies

Certain bite wounds require immediate attention:

  • Bite caused by a wild animal or a stray dog or cat
  • Possibility of teeth, dirt, or other matter in the wound
  • Excessive bleeding
  • Weakness or numbness of the area or another area away from the bite.
  • Any other symptoms or concern that the person bitten may have regarding a bite wound

Animal Bite Treatment

The treatment of animal bites, after initial inspection, irrigation, debridement, and possibly closure depends on many factors, the doctor’s experience, preference, and the type of wound and location of the wound.

Animal Bite Self-Care at Home

Thoroughly clean the wound by washing with soap and tap water as soon as possible. Never use alcohol or hydrogen peroxide on a wound. While hydrogen peroxide was used for years, medical studies have shown that it is harmful to a wound and slows or inhibits the healing process. A light scrubbing should occur during the wash. Then put a clean and dry bandage over the area. This treatment should not replace proper evaluation by a doctor.

Depending on the status of the bite wound, local wound care varies.

If the wound was sutured on the first visit, then the wound should be kept clean and dry. Showers are permitted, but the area should be dried by patting it softly to avoid disrupting the sutures. No baths or submersion of a sutured wound should occur until the stitches are removed and the patient it told it is allowed.

If the wound was left open, then the doctor may recommend daily soaks or other treatments.

  • For minor wounds. If the bite barely breaks the skin and there’s no danger of rabies, treat it as a minor wound. Wash the wound thoroughly with soap and water. Apply an antibiotic cream to prevent infection and cover the bite with a clean bandage.
  • For deep wounds. If the animal bite creates a deep puncture of the skin or the skin is badly torn and bleeding, apply pressure with a clean, dry cloth to stop the bleeding and see your doctor.
  • For infection. If you notice signs of infection, such as swelling, redness, increased pain or oozing, see your doctor immediately.
  • For suspected rabies. If you suspect the bite was caused by an animal that might carry rabies — including any wild or domestic animal of unknown immunization status, particularly bats — see your doctor immediately.

Animal Bites Follow-up

When the patient is discharged from the emergency department or leaves the doctor’s office, they should receive instructions on how to care for the bite wound.

Most doctors will recommend a reevaluation of bites in 48 hours to look for infection.

If the wound was sutured (stitches), the doctor will tell the patient when the stitches will need to be removed.

  • Typically stitches in the face are removed in 3 to 5 days.
  • Stitches over major joints stay in 10 to 14 days.
  • Stitches in other areas are removed in 7 to 10 days.

First aid video for dog or cat

First aid video for bites and stings

First Aid Burns

First aid : Burns

Definition:

A burn is damage to the skin or underlying tissue caused by heat. There are 3 levels of severity; 1st (Superficial), 2nd (Partial thickness), 3rd (Full thickness).

There are three levels of burns:

  • First-degree burns affect only the outer layer of the skin. They cause pain, redness, and swelling.
  • Second-degree burns affect both the outer and underlying layer of skin. They cause pain, redness, swelling, and blistering. They are also called partial thickness burns.
  • Third-degree burns affect the deep layers of skin. They are also called full thickness burns. They cause white or blackened, burned skin. The skin may be numb.

Burns fall into two groups:

Minor burns are:

  • First degree burns anywhere on the body.
  • Second degree burns less than 2-3 inches wide.

Major burns include:

  • Third-degree burns.
  • Second-degree burns more than 2-3 inches wide.
  • Second-degree burns on the hands, feet, face, groin, buttocks, or a major joint.

You can have more than one type of burn at a time.

Causes:

Causes of burns from most to least common are:

  • Fire/flame.
  • Scalding from steam or hot liquids.
  • Touching hot objects.
  • Electrical burns.
  • Chemical burns.

Burns can be the result of:

  • House and industrial fires.
  • Car accidents.
  • Playing with matches.
  • Faulty space heaters, furnaces, or industrial equipment.
  • Unsafe use of firecrackers.
  • Kitchen accidents, such as a child grabbing a hot iron or touching the stove.

This list is not all-inclusive.

You can also burn your airways if you breathe in smoke, steam, super heated air, or chemical fumes in poorly ventilated areas.

Symptoms:

Burn symptoms can include:

  • Blisters (intact or ruptured and leaking fluid).
  • Pain (How much pain you have is unrelated to the level of burn. The most serious burns can be painless.)
  • Peeling skin.
  • Shock (watch for pale and clammy skin, weakness, blue lips and fingernails, and a drop in alertness).
  • Swelling.
  • Red, white, or charred skin.

If you have burned your airways, you may have:

  • Burns on the head, face, neck, eyebrows, or nose hairs.
  • Burned lips and mouth.
  • Coughing.
  • Difficulty breathing.
  • Dark, black-stained mucus.
  • Voice changes.
  • Wheezing.

Is it a minor burn or a major burn?

If it’s not clear what level of care is needed, try to judge the extent of tissue damage, based on the following burn categories:

1st-degree burn

A first-degree burn is the least serious type, involving only the outer layer of skin. It may cause:

  • Redness
  • Swelling
  • Pain

You can usually treat a first-degree burn as a minor burn. If it involves much of the hands, feet, face, groin, buttocks or a major joint, seek emergency medical attention.

2nd-degree burn

A second-degree burn is more serious. It may cause:

  • Red, white or splotchy skin
  • Swelling
  • Pain
  • Blisters

If the second-degree burn is no larger than 3 inches (7.6 centimeters) in diameter, treat it as a minor burn. If the burned area is larger or covers the hands, feet, face, groin, buttocks or a major joint, treat it as a major burn and get medical help immediately.

3rd-degree burns

The most serious burns involve all layers of the skin and underlying fat. Muscle and even bone may be affected. Burned areas may be charred black or white. The person may experience:

  • Difficulty breathing
  • Carbon monoxide poisoning
  • Other toxic effects, if smoke inhalation also occurred

Helping:

  • For 1st and 2nd degree burns you should cool the area immediately with gently running cold water for about 10-15 minutes, or until it has cooled off. Do not break any blisters as this will make the wound worse.
  • For 3rd degree burns do not put anything on the burn, seek medical help immediately and treat for shock. 3rd degree is extremely life threatening even when a small body part is affected. If there is clothing on the burn do not remove it as this may also remove skin. There is a very high risk of infection from this kind of burn.

Notes:

  • As with all other emergencies make sure the area is safe for you first. Watch out for live wires, hot objects, chemical spills, etc.
  • The severity of a burn can also be increased pending on;
  1. Which part of the body is affected, e.g. face, neck.
  2. The amount of the body that is burnt, e.g. only finger tip or entire arm.
  • With electrical burns check for an exit wound as well as treating for the entrance wound.
  • With chemical burns flush the area with lots of water to get it off the casualty’s skin.
  • Never apply ointments, butter, or other home remedies on burns, as this may make the burn worse, keep the heat trapped in, or cause an infection.

First Aid:

Before giving first aid, it is important to determine what type of burn the person has. If you aren’t sure, treat it as a major burn. Serious burns need immediate medical care.Call your local emergency number

For minor burns:

  • Cool the burn to help soothe the pain. Hold the burned area under cool (not cold) running water for 10 to 15 minutes or until the pain eases. Or apply a clean towel dampened with cool tap water.
  • Remove rings or other tight items from the burned area. Try to do this quickly and gently, before the area swells.
  • Don’t break small blisters (no bigger than your little fingernail). If blisters break, gently clean the area with mild soap and water, apply an antibiotic ointment, and cover it with a nonstick gauze bandage.
  • Apply moisturizer, aloe vera lotion or gel, or low-dose hydro cortisone cream, which may provide relief in some cases.
  • If needed, take an over-the-counter pain reliever, such as ibuprofen (Advil, Motrin IB, others), naproxen sodium (Aleve) or acetaminophen (Tylenol, others).
  • Consider a tetanus shot. Make sure that your tetanus booster is up to date. Doctors recommend people get a tetanus shot at least every 10 years.

Major burns

Call emergency medical help for major burns. Until an emergency unit arrives, take these actions:

  • Protect the burned person from further harm. If you can do so safely, make sure the person you’re helping is not in contact with smoldering materials or exposed to smoke or heat. But don’t remove burned clothing stuck to the skin.
  • Check for signs of circulation. Look for breathing, coughing or movement. Begin CPR if needed.
  • Remove jewelry, belts and other restrictive items, especially from around burned areas and the neck. Burned areas swell rapidly.
  • Don’t immerse large severe burns in cold water. Doing so could cause a serious loss of body heat (hypothermia) or a drop in blood pressure and decreased blood flow (shock).
  • Elevate the burned area. Raise the wound above heart level, if possible.
  • Cover the area of the burn. Use a cool, moist, bandage or a clean cloth.

Considerations:

Severe burns need immediate medical care. This can help prevent scarring, disability, and deformity.

Burns on the face, hands, feet, and genitals can be particularly serious.

Children under age 4 and adults over age 60 have a higher chance of complications and death from severe burns because their skin tends to be thinner than in other age groups.

When to Contact a Medical Professional:

Call your local emergency number if:

  • The burn is very large – about the size of your palm or larger.
  • The burn is severe (third degree).
  • You aren’t sure how serious it is.
  • The burn is caused by chemicals or electricity.
  • The person shows signs of shock.
  • The person breathed in smoke.
  • Physical abuse is the known or suspected cause of the burn.
  • There are other symptoms associated with the burn.

For minor burns, call your doctor if you still have pain after 48 hours.

Call immediately if signs of infection develop. These signs include:

  • Drainage or pus from the burned skin.
  • Fever.
  • Increased pain.
  • Red streaks spreading from the burn.
  • Swollen lymph nodes.

Also call immediately if symptoms of dehydration occur with a burn:

  • Decreased urination
  • Dizziness
  • Dry skin
  • Headache
  • Light- headedness
  • Nausea (with or without vomiting)
  • Thirst

Prevention:

To help prevent burns:

  • Install smoke alarms in your home. Check and change batteries regularly.
  • Teach children about fire safety and the hazards of matches and fireworks.
  • Keep children from climbing on top of a stove or grabbing hot items like irons and oven doors.
  • Turn pot handles toward the back of the stove so that children cannot grab them and they cannot accidentally be knocked over.
  • Place fire extinguishers in key locations at home, work, and school.
  • Remove electrical cords from floors and keep them out of reach.
  • Know about and practice fire escape routes at home, work, and school.
  • Set the water heater temperature at 120 degrees or less.

Dos:

  • Stop the burning. Remove the victim from the heat source.
  • Check for any airway obstruction, and to check breathing and circulation. Administer CPR if necessary.
  • For thermal, chemical or contact burns, the first step is to run cold water over the burn for a minimum of 30 minutes. If the burn is small enough, keep it completely under water. Flushing the burn takes priority over calling for help. Flush the burn FIRST.
  • Remove clothing that is not stuck to the burn by cutting or tearing it.
  • Remove rings, belts, shoes and tight clothing before swelling occurs.
  • Cover the burn with a clean, cotton material. If you do not have clean, cotton material, do not cover the burn with anything.
  • Keep the victim covered with a blanket to maintain a normal body temperature until medical help arrives.
  • Call immediately for emergency medical assistance if the burn is extensive/ severe/ chemical/ electrical burn/ uncertainty about the burn’s severity/ the victim shows signs of shock/ the victim has an airway burn.

Do Not:

  • Do NOT apply ointment, butter, ice, medications, cream, oil spray, or any household remedy to a severe burn.
  • Do NOT breathe, blow, or cough on the burn.
  • Do NOT disturb blistered or dead skin.
  • Do NOT remove clothing that is stuck to the skin.
  • Do NOT give the person anything by mouth, if there is a severe burn.
  • Do NOT place a severe burn in cold water. This can cause shock.
  • Do NOT place a pillow under the person’s head if there is an airways burn. This can close the airways.

First aid video for 1st degree burn

First aid video for 2nd degree burn

First aid for 3rd degree burn

 All first aid burn treatment in one video


First Aid Bones & Joints Injuries

First aid : Bones and joint injuries

Introduction:

A fracture is a break or crack in a bone that can be caused by an accident, fall, or blow. Symptoms include a snapping sound as bone breaks, bone protruding from skin, detectable deformity of bone, abnormal movement of bone, grating sensation during movement, pain and tenderness, difficulty in moving or using the affected part, swelling, and discoloration.

A sprain refers to stretched or torn tendons, ligaments, and blood vessels around a joint and can be caused by an accident, fall, or blow. Symptoms of a sprain include pain, tender­ness, swelling, and discoloration in the joint area.

A muscle strain refers to stretched or torn muscle. It can be caused by excessive physical effort or improper posture during activity. Symptoms include pain, stiffness, and possibly swelling in the affected area.

It is sometimes difficult to tell the difference between a fracture and a sprain or strain until an X-ray has been performed. If you cannot tell, treat it as a fracture.

Definition:

  • This is an injury to a bone, a joint, a ligament, or a tendon.
  • Joint injuries usually involve a dislocation. This is where the bone has popped out of its socket. This may be accompanied with a fracture, a strain, or a sprain. It may pop back in it may not. Either way seek medical help. Do not push it back into place.
  • Tendons are strong tissues that connect a muscle onto a bone. When a tendon tears it is called a strain. When they become torn they take a very long time to heal, many times never as good as before, and sometimes surgery is required to reattach them.
  • When a ligament is torn it is called a sprain. Ligaments connect a bone to another bone. These are found around the joints. Ligaments are very strong, but, as with tendons, when they tear they take a long time to heal, never as good as before, and sometimes surgery is required.

Classification:

A Green stick Fracture is when the bone only cracks, and does not fully break. Because these do not break the skin, they should be treated as a Single Fracture. These fractures can be determined by using x-rays.

A Bending Fracture occurs in children only. In this case the bone bends but does not actually break.

A Single Fracture is when the bone breaks in one place, and does not pierce the skin.

A Compound Fracture is when the bone has broken into two pieces

A Commuted Fracture is when the bone is broken in more than two places or crushed.

An Open or Compound Fracture is when the bone has actually punctured the skin and is visible. These breaks are very severe and have a high risk on infection. DO NOT try to set these breaks yourself, instead get professional medical help immediately.

Causes:

  • Any kind of force that is greater than what the tissue can withhold will cause such an injury. Some common activities include falling, twisting, getting hit, etc.

Fracture:

1. SEEK MEDICAL ATTENTION IMMEDIATELY. Call for EMS, or transport victim to emergency room after immobilizing affected area. Wait for EMS and DO NOT attempt to transport victim if you suspect head, back, or neck injury; if there’s a visible deformity of bone; or if the victim cannot be splinted or transported without causing more pain.

2. Suspect back or neck injury if victim is unconscious or has head injury, neck pain, or tingling in arms or legs. If neck or back injury suspected, DO NOT move victim unless necessary to save victim’s life.
3. Immobilize and support affected bone in position found. DO NOT try to push protruding bone back into body or let victim move or use affected area.

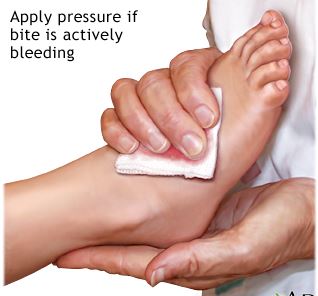
4. Control any bleeding through direct pressure, but DO NOT elevate affected area.

5. If bone is protruding, cover with clean cloth once bleeding is controlled.

6. Observe for shock . DO NOT give victim anything to eat or drink.

7. Immobilize injured area, and, if no open wound present, apply ice pack wrapped in clean cloth.

fracture first aid
Apply ice pack to affected area and cover with cloth.

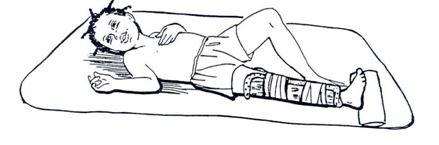
Immobilizing Fractured Bone:

  1. Check for sensation, warmth, and color of toes or fingers below suspected break.
  2. Place padded splint under area of suspected break:

fracture first aid
Use belts or neckties to bind splint to arm but do not bind  on top of the break.

-Use board, rolled newspaper or maga­zines, broomstick, or rolled blanket for splint.

-Wrap splint in cloth or towels for padding.

-Bind splint to limb using neckties, cloth, belts, or rope. DO NOT bind directly over break.

3.Recheck often for sensation, warmth, and coloring. If fingers or toes turn blue or swell, loosen binding.

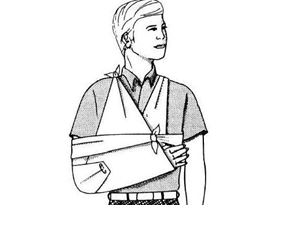
4.For arm or shoulder injury, place splinted arm in sling, with hand above elbow level. Bind arm to victim’s body by wrapping towel or cloth over sling and around upper arm and chest; tie towel or cloth under victim’s opposite arm.

fracture first aid
Create a sling for arm injuries using whatever  cloth you can find.

Warning signs:

  • A ‘snapping’ noise.
  • Pain.
  • Deformity.
  • Inability to move.
  • Swelling.
  • Bruising.

Helping:

  • Apply the RICE principle.

(i)  Rest the injured body part and the entire casualty.

(ii)  Immobilize the injured body part.

(iii) Cold compress over the injury to reduce swelling.

(iv) Elevate the injured body part if it can be done without causing further injury.

  • Seek medical help.
  • Do not rub or move the injured body part.
  • If there is a protruding bone then bleeding will need to be taken care of by applying indirect pressure.
  • Never straighten or realign an injured body part.

Notes:

  • Bone fractures, if set properly, will heal fully in a few weeks and will be stronger than before. This happens because the area builds up with more calcification than before.

Prevention:

  • Use safety equipment and wear it properly.
  • Use seat belts and car seats.
  • Keep joints and bones strong through weight bearing physical activities.

Splints:

The main purpose of a splint is to keep an injured body part immobilized (e.g. a broken leg). It should only be done if paramedics are going to take a long time arriving, or if you have to move the person. Never move or try to realign the injured body part. Always splint in the position found.

There are three main types of splints:

  1. Anatomical: this means using a non-injured body part to immobilize an injured body part. E.g. to splint a broken left lower leg you would tie both legs together so the good leg provides support to the injured leg.
  2.  Soft: this means using something like a thick sweat shirt, a jacket, a towel, or a blanket to wrap around and immobilize. This kind of splint works very well with hand or ankle/foot injuries.
  3. Rigid: this refers to using a firm object, such as a piece of wood, to immobilize. There are many types of rigid splints you can purchase or you can use whatever you see around you e.g. magazines, newspapers, umbrellas, etc.

Splinting the lower leg using a rigid splint.

Splinting and slinging an injured forearm.

Splinting materials include splints, padding and bandages. Ensure that splints are long enough to immobilize the joint above and below the suspected fracture.

Before beginning first aid for fractures gather whatever splinting materials are available.

Splints may be improvised from such items as boards, poles, sticks, tree limbs, rolled magazines, rolled newspapers, or cardboard. If nothing is available for a splint, the person’s chest can be used to immobilize a fractured arm and the uninjured leg can be used to immobilize, to some extent, the fractured leg.

Padding may be improvised from such items as a jacket, blanket, poncho or soft leafy vegetation. Put padding between the splint and the limb. Place extra padding at bony or sensitive areas.

Bandages may be improvised from belts or strips torn from clothing, towels or blankets. Narrow materials such as wire or cord should not be used to secure a splint in place.

First aid video for fracture bone

 First aid video for splint a broken arm