First Aid Diabetes

Diabetes

Diabetes mellitus (DM) is a set of related diseases in which the body cannot regulate the amount of sugar (specifically, glucose) in the blood.

The blood delivers glucose to provide the body with energy to perform all of a person’s daily activities.

  • The liver converts the food a person eats into glucose. The glucose is then released into the bloodstream.
  • In a healthy person, the blood glucose level is regulated by several hormones, primarily insulin. Insulin is produced by the pancreas, a small organ between the stomach and liver. The pancreas also makes other important enzymes released directly into the gut that helps digest food.
  • Insulin allows glucose to move out of the blood into cells throughout the body where it is used for fuel.
  • People with diabetes either do not produce enough insulin (type 1 diabetes) or cannot use insulin properly (type 2 diabetes), or both (which occurs with several forms of diabetes).
  • In diabetes, glucose in the blood cannot move efficiently into cells, so blood glucose levels remain high. This not only starves all the cells that need the glucose for fuel, but also harms certain organs and tissues exposed to the high glucose levels

Types of Diabetes

Type 1 diabetes (T1D): The body stops producing insulin or produces too little insulin to regulate blood glucose level.

  • Type 1 diabetes involves about 10% of all people with diabetes in the United States.
  • Type 1 diabetes is typically diagnosed during childhood or adolescence. It used to be referred to as juvenile-onset diabetes or insulin-dependent diabetes mellitus.
  • Type 1 diabetes can occur in an older individual due to destruction of the pancreas by alcohol, disease, or removal by surgery. It also results from progressive failure of the pancreatic beta cells, the only cell type that produces significant amounts of insulin.
  • People with type 1 diabetes require insulin treatment daily to sustain life.

Type 2 diabetes (T2D): Although the pancreas still secretes insulin, the body of someone with type 2 diabetes is partially or completely unable to use this insulin. This is sometimes referred to as insulin resistance. The pancreas tries to overcome this resistance by secreting more and more insulin. People with insulin resistance develop type 2 diabetes when they fail to secrete enough insulin to cope with their higher demands.

  • At least 90% of adult individuals with diabetes have type 2 diabetes.
  • Type 2 diabetes is typically diagnosed in adulthood, usually after age 45 years. It used to be called adult-onset diabetes mellitus, or non-insulin-dependent diabetes mellitus. These names are no longer used because type 2 diabetes does occur in younger people, and some people with type 2 diabetes require insulin therapy.
  • Type 2 diabetes is usually controlled with diet, weight loss, exercise, and oral medications. However, more than half of all people with type 2 diabetes require insulin to control their blood sugar levels at some point in the course of their illness.

Complications of Diabetes

Both type 1 and type 2 diabetes ultimately lead to high blood sugar levels, a condition called hyperglycemia. Over a long period of time, hyperglycemia damages the retina of the eye, the blood vessels of the kidneys, the nerves, and other blood vessels.

  • Damage to the retina from diabetes (diabetic retinopathy) is a leading cause of blindness.
  • Damage to the kidneys from diabetes (diabetic nephropathy) is a leading cause of kidney failure.
  • Damage to the nerves from diabetes (diabetic neuropathy) is a leading cause of foot wounds and ulcers, which frequently lead to foot and leg amputations.
  • Damage to the nerves in the autonomic nervous system can lead to paralysis of the stomach (gastroparesis), chronic diarrhea, and an inability to control heart rate and blood pressure during postural changes.
  • Diabetes accelerates atherosclerosis, (the formation of fatty plaques inside the arteries), which can lead to blockages or a clot (thrombus). Such changes can then lead to heart attack, stroke, and decreased circulation in the arms and legs (peripheral vascular disease).
  • Diabetes predisposes people to elevated blood pressure, high levels of cholesterol and triglycerides. These conditions both independently and together with hyperglycemia, increase the risk of heart disease, kidney disease, and other blood vessel complications.

Diabetes Causes

Type 1 diabetes: Type 1 diabetes is believed to be an autoimmune disease. The body’s immune system specifically attacks the cells in the pancreas that produce insulin.

  • A predisposition to develop type 1 diabetes may run in families, but genetic causes (a positive family history) are much more common for type 2 diabetes.
  • Environmental factors, including common unavoidable viral infections, may also contribute to type 1 diabetes.
  • Type 1 diabetes is most common in people of non-Hispanic, Northern European descent (especially Finland and Sardinia), followed by African Americans, and Hispanic Americans. It is relatively rare in those of Asian descent.
  • Type 1 diabetes is slightly more common in men than in women.

Type 2 diabetes: Type 2 diabetes has strong genetic links, meaning that type 2 diabetes tends to run in families. Several genes have been identified, and more are under study which may relate to the causes of type 2 diabetes. Risk factors for developing type 2 diabetes include the following:

  • High blood pressure
  • High blood triglyceride (fat) levels
  • Gestational diabetes or giving birth to a baby weighing more than 9 pounds
  • High-fat diet
  • High alcohol intake
  • Sedentary lifestyle
  • Obesity or being overweight
  • Ethnicity, particularly when a close relative had type 2 diabetes or gestational diabetes: certain groups, such as African Americans, Native Americans, Hispanic Americans, and Japanese Americans, have a greater risk of developing type 2 diabetes than non-Hispanic whites.
  • Aging: Increasing age is a significant risk factor for type 2 diabetes. Risk begins to rise significantly at about age 45 years, and rises considerably after age 65 years.

Diabetes Symptoms

Symptoms of type 1 diabetes are often dramatic and come on very suddenly.

  • Type 1 diabetes is usually recognized in childhood or early adolescence, often in association with an illness (such as a virus or urinary tract infection) or injury.
  • The extra stress can cause diabetic ketoacidosis.
    • Symptoms of ketoacidosis include nausea and vomiting. Dehydration and often-serious disturbances in blood levels of potassium follow.
    • Without treatment, ketoacidosis can lead to coma and death.

Symptoms of type 2 diabetes are often subtle and may be attributed to aging or obesity.

  • A person may have type 2 diabetes for many years without knowing it.
  • People with type 2 diabetes can develop hyperglycemic hyperosmolar nonketotic syndrome.
  • Type 2 diabetes can be precipitated by steroids and stress.
  • If not properly treated, type 2 diabetes can lead to complications such as blindness, kidney failure, heart disease, and nerve damage.

Common symptoms of both type 1 and type 2 diabetes include:

  • Fatigue, constantly tired: In diabetes, the body is inefficient and sometimes unable to use glucose for fuel. The body switches over to metabolizing fat, partially or completely, as a fuel source. This process requires the body to use more energy. The end result is feeling fatigued or constantly tired.
  • Unexplained weight loss: People with diabetes are unable to process many of the calories in the foods they eat. Thus, they may lose weight even though they eat an apparently appropriate or even an excessive amount of food. Losing sugar and water in the urine and the accompanying dehydration also contributes to weight loss.
  • Excessive thirst (polydipsia): A person with diabetes develops high blood sugar levels, which overwhelms the kidney’s ability to reabsorb the sugar as the blood is filtered to make urine. Excessive urine is made as the kidney spills the excess sugar. The body tries to counteract this by sending a signal to the brain to dilute the blood, which translates into thirst. The body encourages more water consumption to dilute the high blood sugar back to normal levels and to compensate for the water lost by excessive urination.
  • Excessive urination (polyuria): Another way the body tries to rid the body of the extra sugar in the blood is to excrete it in the urine. This can also lead to dehydration because a large amount of water is necessary to excrete the sugar.
  • Excessive eating (polyphagia): If the body is able, it will secrete more insulin in order to try to manage the excessive blood sugar levels. Moreover, the body is resistant to the action of insulin in type 2 diabetes. One of the functions of insulin is to stimulate hunger. Therefore, higher insulin levels lead to increased hunger. Despite increased caloric intake, the person may gain very little weight and may even lose weight.
  • Poor wound healing: High blood sugar levels prevent white blood cells, which are important in defending the body against bacteria and also in cleaning up dead tissue and cells, from functioning normally. When these cells do not function properly, wounds take much longer to heal and become infected more frequently. Long-standing diabetes also is associated with thickening of blood vessels, which prevents good circulation, including the delivery of enough oxygen and other nutrients to body tissues.
  • Infections: Certain infections, such as frequent yeast infections of the genitals, skin infections, and frequent urinary tract infections, may result from suppression of the immune system by diabetes and by the presence of glucose in the tissues, which allows bacteria to grow. These infections can also be an indicator of poor blood sugar control in a person known to have diabetes.
  • Altered mental status: Agitation, unexplained irritability, inattention, extreme lethargy, or confusion can all be signs of very high blood sugar, ketoacidosis, hyperosmolar hyperglycemia nonketotic syndrome, or hypoglycemia (low sugar). Thus, any of these merit the immediate attention of a medical professional. Call your health care professional or 911.
  • Blurry vision: Blurry vision is not specific for diabetes but is frequently present with high blood sugar levels

untitled

Diabetes Treatment

There are a variety of treatments for diabetes. Type 1 diabetes is treated with insulin injections and lifestyle modifications. Type 2 diabetes is generally treated with lifestyle changes such as diabetic diet, exercise, and medication.

Diabetes Self-Care at Home (Diet, Exercise, and Glucose Monitoring)

If a person has diabetes, healthful lifestyle choices in diet, exercise, and other health habits will help to improve glycemic (blood sugar) control and prevent or minimize complications of diabetes.

Diabetes Diet: A healthy diet is key to controlling blood sugar levels and preventing diabetes complications.

  • If the patient is obese and has had difficulty losing weight on their own, talk to a health care professional. He or she can recommend a dietitian or a weight modification program to help the patient reach a goal.
  • Eat a consistent, well-balanced diet that is high in fiber, low in saturated fat, and low in concentrated sweets.
  • A consistent diet that includes roughly the same number of calories at about the same times of day helps the health care professional prescribe the correct dose of medication or insulin.
  • A healthy diet also helps to keep blood sugar at a relatively even level and avoids excessively low or high blood sugar levels, which can be dangerous and even life-threatening.

Exercise: Regular exercise, in any form, can help reduce the risk of developing diabetes. Activity can also reduce the risk of developing complications of diabetes such as heart disease, stroke, kidney failure, blindness, and leg ulcers.

  • As little as 20 minutes of walking three times a week has a proven beneficial effect. Any exercise is beneficial; no matter how easy or how long, some exercise is better than no exercise.
  • If the patient has complications of diabetes (such as eye, kidney, or nerve problems), they may be limited both in type of exercise, and amount of exercise they can safely do without worsening their condition. Consult with your health care professional before starting any exercise program.

First Aid Dental

Dental

Injuries to the mouth and/or teeth can result from a fall on the face or a direct blow, such as a punch.

A blow under the jaw can result in bitten lips or tongue. Such injuries can be associated with severe bleeding, which can be a risk to the patient’s airway. If a tooth is knocked out in a collision or fall, the correct first aid may save the tooth.

Swelling in or around the mouth can be associated with an injury or severe allergic reaction. This can cause obstruction to the throat and upper airway for which prompt medical assessment and treatment are required.

Symptoms and signs – Not all may be present

  • bleeding from the mouth, lips, tongue or tooth socket
  • pain around or in the mouth following an injury
  • a broken or displaced tooth
  • swelling in the mouth or around the jaw

How you can help

1.    Assess the patient and the injury

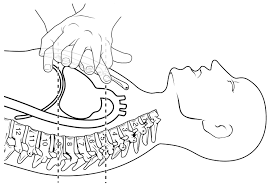
  • Check that the patient’s airway is clear. If there is any risk of blood going down the throat or of increased swelling of the mouth, tongue or throat, turn the patient on the side in a supported position.
  • If the bleeding is only slow or moderate and there appears to be no breathing difficulty, assist the patient into the position of greatest comfort – generally sitting or half-sitting – and check the site of any bleeding.

2.    Control any bleeding

  • Apply firm pressure to any bleeding wound or tooth socket. Fold a sterile dressing or clean tissue into a pad and ask the patient to hold it firmly on the bleeding site for at least 10 minutes.
  • If the bleeding is coming from a cut lip, advise the patient to hold the injured area firmly between the folds of a moist tissue or dressing.

dental_first_front

If a tooth has been knocked out:

  • Handle the displaced tooth by the crown and not the root.
  • Ask the patient to suck it clean and then try to replace the tooth in the original position in the socket to keep the root alive. A small piece of folded aluminium foil may be used as a splint to fix the tooth in place until a dentist is available. A dentist should see the patient within 30 to 60 minutes if the tooth is to be saved.
  • Wrap the foil splint over at least one tooth on each side of the replaced tooth. Ask the patient to bite down firmly on the splint to keep the tooth root in contact with the tissues of the jaw.
  • If the patient cannot assist with replacement of the tooth in the socket, try to keep the tooth moist and clean. If the patient is fully alert, ask the patient to carry the tooth in the mouth between the lower front teeth and lip where it will be bathed in saliva.
  • If the patient is unconscious place the tooth in a clean container with a little milk.

If the bleeding follows the extraction of a tooth by a dental surgeon:

  • Ask the patient to bite down firmly over a pad that covers the tooth socket.
  • Continue to maintain pressure over the pad for at least 10 to 20 minutes to allow a new clot to form.

Obtain medical or dental advice

  • If the injury involves a tooth or the jaw, arrange prompt transport to a dentist or dental hospital. If fully alert, the patient may be transported in a private vehicle.
  • If there is serious bleeding or swelling of the mouth or throat, the patient needs to see a doctor.

First Aid Cuts & Wounds

First aid -Cut and wounds

Introduction:

Cuts are open wounds through the skin. Normally the skin is under slight, constant tension as it covers the body. A cut is a forceful injury to the skin. Many people accidentally cut themselves with household or work items, yard tools, or when operating machinery. Children often are cut during play and sports activities, or from falls while riding wheeled toys, such as bikes, scooters, or skateboards. Most cuts are minor and home treatment is usually all that is needed.

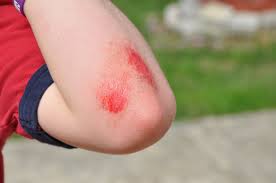
Cuts can be caused by:

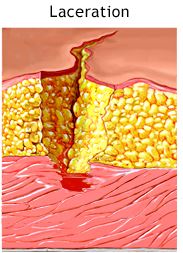
  • Blunt objects that tear or crush the skin (lacerations). These cuts are more common over bony areas, such as a finger, hand, knee, or foot, but they can occur anywhere on the body. Blunt object injuries usually cause more swelling and tissue damage and leave jagged edges, so problems with healing may occur.
  • Sharp-edged pointed objects pressing into and slicing the skin tissue (incised wounds). Sharp object injuries are more likely to cut deeper and damage underlying tissue.
  • Sharp-edged objects piercing the skin tissue (stab or puncture wounds).
  • A combination of blunt and sharp objects that tear, crush, and slice the skin tissue.Picture of a skin lacerationPicture of a puncture wound

Symptoms:

Symptoms include:

  • Bleeding
  • Problems with function or feeling below the wound site
  • Pain

Infection may occur with some cuts and puncture wounds. The following are more likely to become infected:

  • Bites
  • Punctures
  • Crushing injuries
  • Dirty wounds
  • Wounds on the feet
    • Wounds that are not promptly treated

Types of cuts:

Some types of cuts are more serious and need medical evaluation and treatment. These more serious cuts include:

  • Long or deep cuts.
  • Cuts that open with movement of the body area, such as a cut over a joint. A cut over a joint may take a long time to heal because of the movement of the wound edges.
  • Cuts that may scar and affect the appearance or function of a body area. A cut on an eyelid or lip which doesn’t heal well may interfere with function or leave a noticeable scar.
  • Cuts that remove all of the layers of the skin (avulsion injuries), such as slicing off the tip of a finger. An avulsion injury may take a long time to heal.
  • Cuts from an animal or human bite. Infection is more likely with a bite injury.

  • Cuts that have damage to underlying tissues. Injuries to nerves, tendons, or joints are more common with cuts on the hands or feet. Slight swelling, bruising, and tenderness around a cut, bite, scrape, or puncture wound is normal. Swelling or bruising that begins within 30 minutes of the injury often means there is a large amount of bleeding or that damage to deeper tissues is present.
  • Cuts over a possible broken bone. Bacteria can get into a cut over a broken bone and infect the bone.
  • Cuts caused by a crushing injury. With this type of injury, the cut may have occurred when the skin split open from the force of the injury. The force of the injury may also damage underlying tissues and blood vessels. Crush injuries have a high risk of infection.
  • Cuts with a known or suspected object, such as glass or wood, in the wound.

Injury to the skin may also break small blood vessels under the skin and cause more swelling and bruising than you would expect.

When you have a cut:

  • Stop the bleeding with direct pressure to the wound.
  • Determine if other tissues, such as blood vessels, nerves, tendons, ligaments, joints, bones, or internal organs, have been injured.
  • Determine if treatment by a doctor, such as stitches, staples, or skin adhesives, is needed.
  • Clean the wound and remove any dirt or debris to prevent infections, both bacterial skin infections and tetanus (“lockjaw”).
  • Determine whether you need a tetanus shot.

Cuts to the head or face may appear worse than they are and bleed a lot because of the good blood supply to this area. Controlling the bleeding will allow you to determine the seriousness of the injury.

FOR MINOR CUTS:

  • Wash your hands with soap or antibacterial cleanser to prevent infection.
  • Then, wash the cut thoroughly with mild soap and water.
  • Use direct pressure to stop the bleeding.
  • Apply antibacterial ointment and a clean bandage that will not stick to the wound.

FOR MINOR PUNCTURES:

  • Wash your hands with soap or antibacterial cleanser to prevent infection.
  • Rinse the puncture for 5 minutes under running water. Then wash with soap.
  • Look (but do not poke around) for objects inside the wound. If found, don’t remove it. Go to your emergency or urgent care center.
  • If you can’t see anything inside the wound, but a piece of the object that caused the injury is missing, also seek medical attention.
  • Apply antibacterial ointment and a clean bandage that will not stick to the wound.

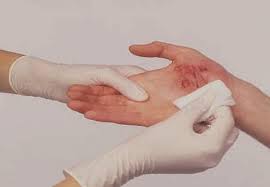
If emergency treatment is not needed, bleeding can usually be stopped by applying steady, direct pressure and elevating the wound. The following steps will protect the skin wound and protect you from exposure to another person’s blood.

Stop the bleeding

  • Have the injured person lie down and elevate the site that is bleeding.
  • Remove any visible objects in the wound that are easy to remove. Control the bleeding before trying to clean the wound.
  • Remove or cut clothing from around the wound. Remove any jewelry from the general area of the wound so if the area swells, the jewelry will not affect blood flow.
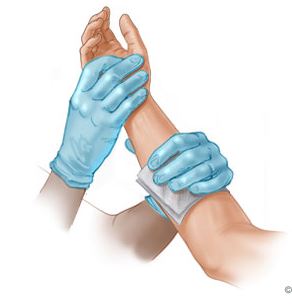
  • Apply steady, direct pressure and elevate the area for a full 15 minutes. Use a clock—15 minutes can seem like a long time. Resist the urge to peek after a few minutes to see whether bleeding has stopped. If blood soaks through the cloth, apply another one without lifting the first. If there is an object in the wound, apply pressure around the object, not directly over it.
  • If moderate to severe bleeding has not slowed or stopped, continue direct pressure while getting help. Do not use a tourniquet to stop the bleeding. Do all you can to keep the wound clean and avoid further injury to the area.
  • Mild bleeding usually stops on its own or slows to an ooze or trickle after 15 minutes of pressure. It may ooze or trickle for up to 45 minutes.

Clean the wound

Clean the wound as soon as possible to reduce the chance of infection, scarring, and tattooing of the skin from dirt left in the wound.

  • Remove large pieces of dirt or other debris from the wound with cleaned tweezers. Do not push the tweezers deeply into the wound.
  • Wash the wound for 5 minutes with large amounts of cool water and soap (mild dish washing soap, such as Ivory, works well). Some nonprescription products are available for wound cleaning that numb the area so that cleaning doesn’t hurt as much. Be sure to read the product label for correct use.
  • Don’t use rubbing alcohol, hydrogen peroxide, iodine, or Mercurochrome, which can harm the tissue and slow healing.

Consider applying a bandage

Most cuts heal well and may not need a bandage. You may need to protect the cut from dirt and irritation. Be sure to clean the cut thoroughly before bandaging it to reduce the risk of infection occurring under the bandage.

  • Select the bandage carefully. There are many products available. Liquid skin bandages and moisture-enhancing bandages are available with other first aid products. Before you buy or use one, be sure to read the label carefully, and follow the label’s instructions when you apply the bandage.
  • If you use a cloth-like bandage, apply a clean bandage when it gets wet or soiled to further help prevent infection. If a bandage is stuck to a scab, soak it in warm water to soften the scab and make the bandage easier to remove. If available, use a nonstick dressing. There are many bandage products available. Be sure to read the product label for correct use.
  • Watch for signs of infection. If you have an infection under a bandage, a visit to your doctor may be needed.
  • An antibiotic ointment, such as polymyxin B sulfate (for example, Polysporin) or bacitracin, will keep the bandage from sticking to the wound. Apply the ointment lightly to the wound. Antibiotic ointments have not been shown to improve healing. Be sure to read the product label about skin sensitivity. If you have a skin rash or itching under the bandage, stop using the ointment. The rash may be caused by an allergic reaction to the ointment.
  • Use an adhesive strip to hold the edges of a wound together. Always put an adhesive strip across a wound to hold the edges together, not lengthwise. You can make a butterfly bandage at home or purchase one to help hold the skin edges together.

Picture of a butterfly bandage

DO NOT:

  • Do NOT assume that a minor wound is clean because you can’t see dirt or debris inside. Always wash it.
  • Do NOT breathe on an open wound.
  • Do NOT try to clean a major wound, especially after the bleeding is under control.
  • Do NOT remove a long or deeply stuck object. Seek medical attention.
  • Do NOT push or pick debris from a wound. Seek medical attention.
  • Do NOT push body parts back in. Cover them with clean material until medical help arrives.

First aid for Cuts

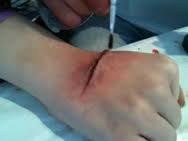
First aid for cut and scrapes

First Aid CPR

First aid -CPR

Cardiopulmonary Resuscitation (CPR) Definition

Cardiopulmonary resuscitation (CPR) is a procedure performed in an emergency when the heart stops, with the goal of prolonging circulatory and lung function.

The Importance of CPR:

Although advances in emergency cardiac care continue to improve the chances of surviving cardiac arrest, cardiac arrest remains a leading cause of death in many parts of the world.

Each year, almost 350,000 Americans die from heart disease. Half of these will die suddenly, outside of the hospital, because their heart stops beating.

  • The most common cause of death from a heart attack in adults is a disturbance in the electrical rhythm of the heart called ventricular fibrillation.
    • Ventricular fibrillation can be treated, but it requires applying an electrical shock to the chest called defibrillation.
    • If a defibrillator is not readily available, brain death will occur in less than 10 minutes.
  • One way of buying time until a defibrillator (AED) becomes available is to provide artificial breathing and circulation by performing cardiopulmonary resuscitation, or CPR.
    • The earlier you give CPR to a person in cardiopulmonary arrest (no breathing, no heartbeat), the greater the chance of a successful resuscitation.
    • By performing CPR, the affected individual receives oxygenated blood flowing to the heart and brain until a defibrillator becomes available.

CPR is one link in what the American Heart Association calls the “chain of survival.” The chain of survival is a series of actions that, when performed in sequence, will give a person having a heart attack the greatest chance of survival.

  • The first link in the chain of survival is immediate recognition of cardiac arrest and activation of the emergency response system by calling 911 (check your community plan, some communities require dialing a different number).
  • The next link in the chain of survival is to perform CPR until a defibrillator becomes available.
  • The next link in the chain of survival is to perform early CPR, with an emphasis on chest compressions until a defibrillator becomes available.
  • Following early CPR, the next link is to provide rapid defibrillation.
  • In many areas of the country, simple, computerized defibrillators, known as automated external defibrillators, or AEDs,
  • may be available for use by the lay public or first person on the scene.
  • Once the EMS unit arrives, the next link in the chain of survival is effective advanced life support care. This involves administering medications, using special breathing devices, and providing additional defibrillation shocks if needed.

Cardiac Arrest:

When a person develops cardiac arrest, the heart stops beating. There is no blood flow and no pulse. With no blood flowing to the brain, the person becomes unresponsive and stops breathing normally.

  1. When you discover a person whom you believe is experiencing a medical emergency, the first thing to do is check for responsiveness. Gently shake the victim and shout, “Are you OK?”
  2. If the person does not respond to your voice or touch, they are unresponsive. If the victim is unresponsive and you are alone, leave the victim and immediately call emergency. If someone is with you, tell him or her to call emergency and then return to help you.
  3. If an AED is available, bring it back to the person’s side. The moment an AED becomes available, IMMEDIATELY press the “on” button. The AED will begin to speak to you. Follow the directions to use the AED.

Start with Chest Compression

  • If the person is not breathing normally, begin doing chest compression. Place the heel of one hand on the center of the chest, right between the nipples. Place the heel of your other hand on top of the first hand. Lock your elbows and position your shoulders directly above your hands. Press down on the chest with enough force to move the breastbone down about 2 inches. Compress the chest 30 times, at a rate of at least 100 times per minute (slightly faster than once every second). Allow the chest to completely recoil after each compression.

  • After 30 compression, stop, open the airway while keeping the victim’s head tilted back, and provide two slow breaths. Place your mouth around the victim’s mouth and pinch the nose shut. Then, position your hands in the same spot as before and perform another 30 chest compression. Continue the cycles of 30 compression’s and two breaths until an AED becomes available or until EMS providers arrive. With the fear of contracting an infection from a person by providing mouth to mouth breathing, it is no longer necessary to provide two breaths to the affected individual. The most important step you can provide is at least 100 compression’s per minute to the affected individual until help arrives.
  • This technique of performing CPR may be used on anyone older than eight years of age.

CPR in Children

Sudden cardiac arrest is less common in children than it is in adults. It usually occurs when there is a lack of oxygen caused by a breathing problem such as choking, near-drowning, or respiratory infections.

In order to use an AED on a child from one year of age through eight years of age a special pediatric cable is used to reduce the amount of energy provided by the electrical shock.

Doing CPR on children aged one year to eight years is similar to doing CPR on adults. However, there are some minor differences. Most are due to the child’s smaller size.

  • When compressing the chest, the heel of only 1 hand is used instead of two hands, and the chest is pressed down approximately 2 inches.
  • Perform 5 cycles of 30 chest compression’s followed by two breaths, then use an AED to evaluate the heart rhythm if available. If an AED is not available, and the child is still not breathing normally, coughing, or moving, continue cycles of 30 compression’s to two breaths until help arrives.

CPR in Infants:

An infant is defined as a child younger than one year of age. Because an infant is smaller than a child, the CPR technique for infants contains further changes.

  • Even smaller breaths are given-enough to just get the chest to rise. Only two fingers are used to compress the chest down about 1 and 1/2 inches.
  • Otherwise, the CPR sequence is the same as for the child.
  • Manual defibrillation is the preferred method of defibrillation in infants, however, if only an AED is available, it is recommended that a pediatric AED cable be used for infant defibrillation.

CPR Pictures:

  • Check for responsiveness by gently shaking the victim and shouting, “Are you OK?”.

  • If the victim is unresponsive, immediately call EMERGENCY. If an automated external defibrillator is available, bring it to the person’s side.

  • The moment an AED becomes available, IMMEDIATELY press the “On” button. The AED will speak to you. Follow the directions given.

  • Place the heel of one hand on the center of the chest, right between the nipples. Place the heel of your other hand on top of the first hand. Lock your elbows and position your shoulders directly above your hands.

  • Press down on the chest with enough force to move the breastbone down about 2 inches. Compress the chest 30 times, at a rate of at least 100 times per minute
  • Provide two rescue breaths. Place you mouth around the victim’s mouth; pinch off the nose and administer two slow breaths. Make sure the chest rises with each breath.

  • Repeat the 30 compressions and two breaths until help arrives.

CPR videos for baby and adult

CPR for Baby

CPR for Adult

First Aid Choking

First aid for choking

Choking Overview

Choking is a blockage of the upper airway by food or other objects, which prevents a person from breathing effectively. Choking can cause a simple coughing fit, but complete blockage of the airway may lead to death.

Choking is a true medical emergency that requires fast, appropriate action by anyone available. Emergency medical teams may not arrive in time to save a choking person’s life.

Breathing is an essential part of life. When we inhale, we breathe in a mix of nitrogen, oxygen, carbon dioxide, and other gases.

  • In the lungs, oxygen enters the bloodstream to travel to the rest of the body. Our bodies use oxygen as a fuel source to make energy from the food we eat. Carbon dioxide, a waste product, enters the bloodstream and travels back to the lungs.
  • When we exhale, we breathe out carbon dioxide, nitrogen, and oxygen.
  • When someone is choking with a completely blocked airway, no oxygen can enter the lungs. The brain is extremely sensitive to this lack of oxygen and begins to die within four to six minutes. It is during this time that first aid must take place. Irreversible brain death occurs in as little as 10 minutes.

Choking Causes

Choking is caused when a piece of food or other object gets stuck in the upper airway.

Any object that ends up in the airway will become stuck as the airway narrows. Many large objects get stuck just inside the trachea at the vocal cords.

Choking Symptoms

If an adult is choking, you may observe the following behaviors:

  • Coughing or gagging
  • Hand signals and panic (sometimes pointing to the throat)
  • Sudden inability to talk
  • Clutching the throat: The natural response to choking is to grab the throat with one or both hands. This is the universal choking sign and a way of telling people around you that you are choking.
  • Wheezing
  • Passing out
  • Turning blue: Cyanosis, a blue coloring to the skin, can be seen earliest around the face, lips, and fingernail beds. You may see this, but other critical choking signs would appear first.
  • If an infant is choking, more attention must be paid to an infant’s behavior. They cannot be taught the universal choking sign.
    • Difficulty breathing
    • Weak cry, weak cough, or both

Choking Self-Care at Home

To perform abdominal thrusts on someone else:

  • Stand behind the person. Wrap your arms around the waist. Tip the person forward slightly.
  • Make a fist with one hand. Position it slightly above the person’s navel.
  • Grasp the fist with the other hand. Press hard into the abdomen with a quick, upward thrust — as if trying to lift the person up.
  • Perform a total of 5 abdominal thrusts, if needed. If the blockage still isn’t dislodged, repeat the five-and-five cycle.

Pictures of Abdominal Thrusts:

To perform abdominal thrusts (Heimlich maneuver) on yourself:

First, if you’re alone and choking, call  or your local emergency number immediately. Then, although you’ll be unable to effectively deliver back blows to yourself, you can still perform abdominal thrusts to dislodge the item.

  • Place a fist slightly above your navel.
  • Grasp your fist with the other hand and bend over a hard surface — a counter top or chair will do.
  • Shove your fist inward and upward.

To clear the airway of a pregnant woman or obese person:

  • Position your hands a little bit higher than with a normal Heimlich maneuver, at the base of the breastbone, just above the joining of the lowest ribs.
  • Proceed as with the Heimlich maneuver, pressing hard into the chest, with a quick thrust.
  • Repeat until the food or other blockage is dislodged or the person becomes unconscious.

To clear the airway of an unconscious person:

  • Lower the person on his or her back onto the floor.
  • Clear the airway. If a blockage is visible at the back of the throat or high in the throat, reach a finger into the mouth and sweep out the cause of the blockage. Be careful not to push the food or object deeper into the airway, which can happen easily in young children.
  • Begin cardiopulmonary resuscitation (CPR) if the object remains lodged and the person doesn’t respond after you take the above measures. The chest compression used in CPR may dislodge the object. Remember to recheck the mouth periodically.

To clear the airway of a choking infant younger than age 1:

  • Assume a seated position and hold the infant face down on your forearm, which is resting on your thigh.
  • Thump the infant gently but firmly five times on the middle of the back using the heel of your hand. The combination of gravity and the back blows should release the blocking object.
  • Hold the infant face up on your forearm with the head lower than the trunk if the above doesn’t work. Using two fingers placed at the center of the infant’s breastbone, give five quick chest compression.
  • Repeat the back blows and chest thrusts if breathing doesn’t resume. Call for emergency medical help.
  • Begin infant CPR if one of these techniques opens the airway but the infant doesn’t resume breathing.

If the child is older than age 1, give abdominal thrusts only.

                      PART-1                                                                                PART-2

PART-3                                                                                PART-4

PART-

First aid video for choking adults & child

First aid video for choking baby