First Aid Frostbite

First aid – Frostbite

Overview:

Frostbite occurs when tissues freeze. This condition happens when you are exposed to temperatures below the freezing point of skin. Hypothermia is the condition of developing an abnormally low body temperature. Frostbite and hypothermia are both cold-related medical emergencies.

Although frostbite used to be a military problem, it is now a civilian one as well. The nose, cheeks, ears, fingers, and toes are most commonly affected. Everyone is susceptible, even people who have been living in cold climates for most of their lives. Some groups of people at greatest risk for frostbite and hypothermia include those:

  • who spend a great deal of time outdoors, such as the homeless, hikers, hunters, etc.;
  • under the influence of alcohol;
  • who are elderly without adequate heating, food, and shelter;
  • who are exhausted or excessively dehydrated;
  • who are mentally ill.

When exposed to very cold temperatures, skin and underlying tissues may freeze, resulting in frostbite. The areas most likely to be affected by frostbite are your fingers toes, nose, ears, cheeks and chin.

If your skin pales or turns red and is very cold, hard or waxy looking, you may have frostbite. You may also experience a prickling feeling or numbness. With severe or deep frostbite, you may experience blistering and pain.

You can treat very mild frostbite (frost nip) with first-aid measures.All other frostbite requires medical attention.

Definition:

Frostbite is damage to the skin and underlying tissues caused by extreme cold. Frostbite is the most common freezing injury.

Alternative Names:

Cold exposure – arms or legs

Causes:

In conditions of prolonged cold exposure, the body sends signals to the blood vessels in the arms and legs telling them to constrict (narrow). By slowing blood flow to the skin, the body is able to send more blood to the vital organs, supplying them with critical nutrients, while also preventing a further decrease in internal body temperature by exposing less blood to the outside cold.

Frostbite occurs when the skin and body tissues are exposed to cold temperature for a long period of time.

You are more likely to develop frostbite if you:

  • Take medicines called beta-blockers
  • Have poor blood supply to the legs
  • Smoke
  • Have diabetes
  • Have Raynaud’s phenomenon

Frostbite is caused by two different means: cell death at the time of exposure and further cell deterioration and death because of a lack of oxygen.

  • In the first, ice crystals form in the space outside of the cells. Water is lost from the cell’s interior, and dehydration promotes the destruction of the cell.
  • In the second, the damaged lining of the blood vessels is the main culprit. As blood flow returns to the extremities upon rewarming, it finds that the blood vessels themselves are injured, also by the cold. The vessel walls become permeable and blood leaks out into the tissues. Blood flow is impeded and turbulent and small clots form in the smallest vessels of the extremities. Because of these blood flow problems, complicated interactions occur, leading to inflammation that causes further tissue damage. This injury is the primary determinant of the amount of tissue damage that occurs in the end.
  • It is rare for the inside of the cells themselves to be frozen. This phenomenon is only seen in very rapid freezing injuries, such as those produced by frozen metals.

Symptoms:

Symptoms of frostbite include:

  • Pins and needles feeling, followed by numbness.
  • Hard, pale, and cold skin that has been exposed to the cold for too long.
  • Aching, throbbing or lack of feeling in the affected area.
  • Red and extremely painful skin and muscle as the area thaws.

Very severe frostbite may cause:

  • Blisters.
  • Gangrene (blackened, dead tissue).
  • Damage to tendons, muscles, nerves, and bone.

Frostbite may affect any part of the body. The hands, feet, nose, and ears are the places most prone to the problem.

  • If the frostbite did not affect your blood vessels, a complete recovery is possible.
  • If the frostbite affected the blood vessels, the damage is permanent. Gangrene may occur. This may require removal of the affected body part (amputation).

Types of frostbite:

A variety of frostbite classification systems have been proposed. The easiest to understand, and perhaps the one that gives the best clues to outcome, divides frostbite into two main categories:

1) superficial and

2) deep.

  • In superficial frostbite, you may experience burning, numbness, tingling, itching, or cold sensations in the affected areas. The regions appear white and frozen, but if you press on them, they retain some resistance.
  • In deep frostbite, there is an initial decrease in sensation that is eventually completely lost. Swelling and blood-filled blisters are noted over white or yellowish skin that looks waxy and turns a purplish blue as it rewarms. The area is hard, has no resistance when pressed on, and may even appear blackened and dead.
  • The affected person will experience significant pain as the areas are rewarmed and blood flow reestablished. A dull continuous ache transforms into a throbbing sensation in 2 to 3 days. This may last weeks to months until final tissue separation is complete.
  • At first the areas may appear deceptively healthy. Most people do not arrive at the doctor with frozen, dead tissue. Only time can reveal the final amount of tissue damage.

There are milder conditions related to frostbite, including frost nip, chilblains, and trench foot.

  • Frost nip refers to the development of tingling sensations (parenthesizes)  that occur due to cold exposure. They disappear upon rewarming without any tissue damage.
  • Chilblain (or pernio) refers to a localized area of tissue inflammation that appears as swollen and reddish or purple. These develop in response to repeated exposure to damp, cold conditions above the freezing point. Chilblains may itch or be painful.
  • Trench foot was described in World War I as a result of repeated exposure to dampness and cold and exacerbated by tight boots. The affected feet are reddened, swollen, painful or numb, and may be covered with bleeding blisters. This condition is still observed in some homeless persons today.

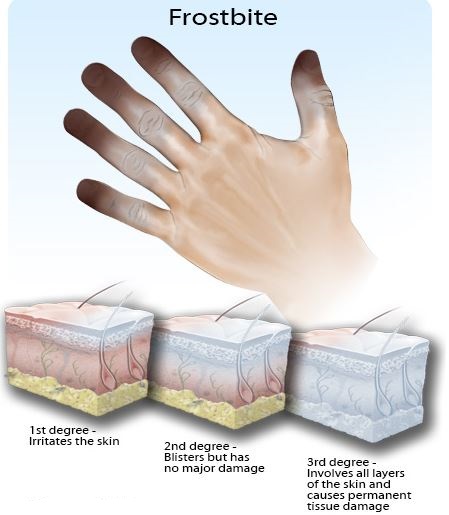
Stages of frostbite:

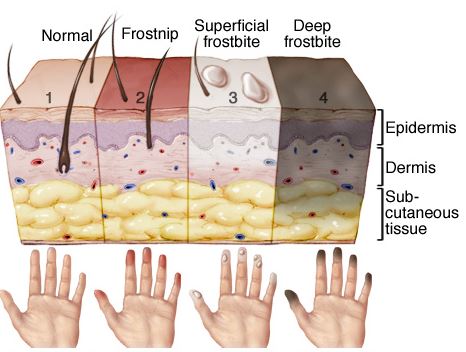
Skin without cold damage is normal:

(1). Frostnip.

(2) is mild frostbite that irritates the skin, causing redness, prickling and a cold feeling followed by numbness. Frostnip doesn’t permanently damage the skin and can be treated with first-aid measures. With superficial frostbit.

(3), your skin feels warm, a sign of serious skin involvement. A fluid-filled blister may appear 24 to 36 hours after rewarming the skin. With deep frostbite.

(4), you may experience numbness. Joints or muscles may no longer work. Large blisters form 24 to 48 hours after rewarming. Afterward, the area turns black and hard as the tissue dies.

First Aid:

A person with frostbite on the arms or legs may also have hypothermia (lowered body temperature). Check for hypothermia and treat those symptoms first.

Take the following steps if you think someone might have frostbite:

  1. Shelter the person from the cold and move him or her to a warmer place. Remove any tight jewelry and wet clothes. Look for signs of hypothermia (lowered body temperature) and treat that condition first.
  2. If you can get quick medical help, it is best to wrap the damaged areas in sterile dressings. Remember to separate affected fingers and toes. Transport the person to an emergency department for further care.
  3. If medical help is not nearby, you may give the person rewarming first aid. Soak the affected areas in warm (never hot) water — for 20 to 30 minutes. For ears, nose, and cheeks, apply warm cloths repeatedly. The recommended water temperature is 104 to 108 degrees Fahrenheit. Keep circulating the water to aid the warming process. Severe burning pain, swelling, and color changes may occur during warming. Warming is complete when the skin is soft and feeling returns.
  4. Apply dry, sterile dressings to the frostbitten areas. Put dressings between frostbitten fingers or toes to keep them separated.
  5. Move thawed areas as little as possible.
  6. Refreezing of thawed extremities can cause more severe damage. Prevent refreezing by wrapping the thawed areas and keeping the person warm. If protection from refreezing cannot be guaranteed, it may be better to delay the initial rewarming process until a warm, safe location is reached.
  7. If the frostbite is severe, give the person warm drinks to replace lost fluids.

When to Contact a Medical Professional:

Call your doctor or nurse if:

  • You had severe frostbite.
  • Normal feeling and color do not return promptly after home treatment for mild frostbite.
  • Frostbite has occurred recently and new symptoms develop, such as fever, general ill-feeling, skin discoloration, or drainage from the affected body part.

Self Care at home:

  • First, call for help.
  • Keep the affected body part elevated in order to reduce swelling.
  • Move to a warm area to prevent further heat loss.
  • Note that many people with frostbite may be experiencing hypothermia. Saving their lives is more important than preserving a finger or foot.
  • Do not walk on frostbitten toes or feet if at all possible.
  • Remove all wet clothing and constrictive jewelry because they may further block blood flow.
  • Give the person warm, nonalcoholic, non caffeinated fluids to drink.
  • Apply a dry, sterile bandage, place cotton between any involved fingers or toes (to prevent rubbing), and take the person to a medical facility as soon as possible.
  • Do not rub the frozen area with snow (or anything else). The friction created by this technique will only cause further tissue damage.

Dos:

  • DO keep the water moving a little. It helps keep the warmest water next to the injury.
  • DO be very gentle with the damaged tissue.
  • DO handle with care.
  • DO keep the injured area at heart level or above.
  • DO consider taking a vasodilator (medicine that opens up the blood-vessel flow). Some blood-pressure medicines help if you’re already on them. Aspirin may help.
  • DO keep absorbent padding, such as gauze or cotton, between injured fingers or toes.
  • DO cover the wound with a light dressing or leave it open to the air.
  • DO Get to a warm room or environment immediately.

Do Not:

  • Do NOT thaw out a frostbitten area if it cannot be kept thawed. Refreezing may make tissue damage even worse.
  • Do NOT use direct dry heat (such as a radiator, campfire, heating pad, or hair dryer) to thaw the frostbitten areas. Direct heat can burn the tissues that are already damaged.
  • Do NOT rub or massage the affected area.
  • Do NOT disturb blisters on frostbitten skin.
  • Do NOT smoke or drink alcoholic beverages during recovery as both can interfere with blood circulation.
  • Don’t use restrictive dressings.
  • Don’t walk, stand, or put pressure on the injured area.

Frostbite Prevention:

The first step in preventing frostbite is knowing whether you are at increased risk for the injury.

  • Most cases of frostbite are seen in alcoholics, people with psychiatric illness, victims of car accidents or car breakdowns in bad weather, and cases of recreational drug misuse.
  • All of these conditions share the problem of cold exposure and either the unwillingness or inability of a person to remove himself or herself from this threat.
  • Tobacco smokers and people with diseases of the blood vessels (such as those with diabetes) also are at increased risk because they have an already decreased amount of blood flow to their arms and legs.
  • Homelessness, fatigue, dehydration, improper clothing, and high altitude are additional risk factors.

Although people don’t always know or acknowledge these dangers, many of the dangers can be reduced or prevented.

  • Dress for the weather.
  • Layers are best, and mittens are better than gloves (keeps your warm fingers together while warming each other).
  • Wear two pairs of socks with the inner layer made of synthetic fiber, such as polypropylene, to wick water away from the skin and the outer layer made of wool for increased insulation.
  • Shoes should be waterproof.
  • Cover your head, face, nose, and ears at all times.
  • Clothes should fit loosely to avoid a decrease in blood flow to the arms and legs.
  • Always travel with a friend in case help is needed.
  • Avoid smoking and alcohol.
  • The very old, very young, those who are not in good physical condition, and people with diabetes and anyone with vessel disease should take extra precautions.
  • Be especially wary of wet and windy conditions. The “feels like” temperature (windchill) is actually much lower than the stated air temperature.

First aid Treatment

First aid frostbite tips

First Aid Kit

First Aid Kit

Introduction:

First aid kits are a legal requirement for every workplace. It must also be clearly marked in a green box with a white cross on it. Your staff should all be made aware of where their nearest first aid box is located; it should be easily accessible for people and the contents should be checked regularly to make sure all items are in stock and in date.

Keep a first aid kit readily available in your home, cottage, car, boat, workplace, and recreation area. Store it in a dry place and replace used or outdated contents regularly.

The Health and Safety (First-Aid) Regulations 1981 require you to provide adequate and appropriate first-aid equipment, facilities and people so your employees can be given immediate help if they are injured or taken ill at work.

What is ‘adequate and appropriate’ will depend on the circumstances in your workplace and you should assess what your first-aid needs are.

The minimum first-aid provision on any work site is:

  • a suitably stocked first-aid box
  • an appointed person to take charge of first-aid arrangements
  • information for employees about first-aid arrangements.

It is important to remember that accidents and illness can happen at any time. First aid provision needs to be available at all times people are at work.

There are so many options and so much that could be in a kit.

To find out which first aid kit is best for you start with the following questions:

  • Where do you plan to use it?
  • Is it for the car, home, boat, holiday or overseas travel?
  • What will it be used for?
  • What are the likely accidents or injuries that you may encounter?

Maybe the first aid kit is needed for a group activity.

  • What activities will the group be doing? “Lazing” around listening to lectures or doing extreme sports?

Depending on what you are wanting the kit for and the amount of people it needs to cover, will influence the size of the kit and the type of container you store it in. A tackle box makes a good first aid kit container or it can be as simple as a resealable clip lock bag. Where you keep the kit will also influence its size. So where will you store the kit?

  • bathroom cabinet
  • kitchen cabinet
  • car (if it is a small kit the glove compartment is most accessible)
  • boat
  • workshop
  • garage
  • backpack

Your First Aid Kit should always be kept in an area where it can be easily found and accessed.

Variety of first aid kit checklists:

Basic First Aid Kit – A basic first aid kit doesn’t need to include every piece of First Aid equipment though it might as well have basic yet useful content.

Motor Cycle First Aid Kit – A Motorcycle First Aid Kit has special needs. An ordinary first aid kit just won’t cut it. They need a different balance of first aid content. Check out our Motorcycle First Aid Kit Checklist.

Marine First Aid Kit – If you get injured on a boat you may not be near help. You need to be able to treat yourself and your shipmates for any emergency that might arise. You will be set for almost any boating injury with this Marine First Aid Kit Checklist.

Wilderness First Aid Kit – We have put together a wilderness first aid kit checklist which is the minimum of what you should be taking with you. It will help you put together a first aid kit that will tackle many injuries and ailments that might come your way while in the wilds.

Backpacking First Aid Kit – When going backpacking taking a first aid kit is a must as you can’t always find a doctor near by. It is vital to be prepared for emergencies. Check out our backpacking first aid kit checklist. Also there are questions for you to answer that will help narrow down what is crucial to pack in the first aid kit.

Hiking First Aid Kit – Never be complacent when packing for a hike and always carry a hiking first aid kit with you. The one time you don’t will be the time you need it. We’ve created a list of some important safety items to consider when putting together your own hiking first aid kit.

Travel First Aid Kit – When traveling research your destination. Some areas may have dangerous or venomous wildlife while others are notorious for having polluted water that harbors nastiest such as giardia or the like. Be sure you know what to avoid and take what you need as a safety precaution. Checklist Coming Soon

Vehicle First Aid Kit – It makes sense to have a Vehicle First Aid Kit on hand for accidents you may come across while traveling on the road. You may need to deal with injuries ranging from bruises, cuts and scrapes, to moderate injuries, such as broken bones. Then there are the more serious, life-altering injuries like severe bleeding, or even an unconscious person where you may need to do CPR. Be prepared.

A few more important suggestions:

  • Remember to always check medication expiry dates and replace outdated items in your kit.
  • Store the kit out of the reach of little ones who might find it an interesting play thing to explore.
  • Know how to use the items in the kit – Become familiar with a first aid manual you find easy to understand so that you will not be scrabbling to learn something from scratch but will be able to scan instructions to remind you what to do.
  • Keep your first aid manual with the first aid kit at all times.
  • If you have not done a First Aid Training Course, strongly recommends that you either do a course in your local area or online.

Basic first aid kit:

A basic first aid kit doesn’t need to include every piece of First Aid equipment although it might as well have basic yet useful content.

So what do we suggest goes in a basic first aid kit?

  • Basic first aid manual – one that is easy to understand. Sometimes it’s hard to remember what to do in an emergency. A pocket-sized manual comes in handy, taking you step-by-step through first aid care. We think it is best to read through it so the layout and contents are familiar before you need it in the heat of the moment.
  • Antiseptic wipes or gel – for cleaning your hands before touching open cuts and wounds.
  • Gauze and non-adhesive dressing pads – preferably sterile. They come in all sizes. One option, if you are trying to save space, is to get a bigger size dressing that you can cut to size as needed. It will save space.
  • Elastic and crepe bandages – a few different widths.
  • Triangular Bandage – For slings, padding, strapping limbs to splints when fractures are suspected.
  • Adhesive Tape – I prefer paper tape as you do not have to have scissors to cut it as it will tear by just using your fingers – Get a good quality tape that will not get brittle with age or lose it’s stickiness. It is useless when that occurs.
  • Curved Scissors – Scissors come in handy in many ways. Curved medical ones are great as they don’t have sharp points. In an emergency you might need to cut clothes away from an injury. With sharp edges it is easy to poke through something and cause further injury when you are in a hurry or under stress.
  • Two tongue depressors or ice block sticks for finger splints.
  • Instant Cold Pack/s – These are so useful for burns, bruising, swelling and sprains. They are single use, so if you have space grab a couple for your kit.
  • Band Aids – a variety of shapes and sizes for small cuts and scrapes. I find the long strips of cloth tape with the padding in place already is great because you can cut it to size.
  • Tweezers – A good pair of tweezers has easy-to-grip handles and can be used for splinter removal and other first aid procedures. Do not bother with a poor quality pair that will not grip a splinter you are trying to pull out as you will just get frustrated.
  • Pain Reliever Capsules or liquid (liquid is best for children who can not swallow tablets).
  • Anti-histamine – tablets or liquid (again for those that can not swallow tablets).
  • Stings and Bites Cream- I prefer one with a local anesthetic especially for the kids. My son scratches his bites when he is asleep and ends up with bleeding and weeping sores so knocking out the itchiness of bites before he goes to sleep reduces the scratching.

Other things to consider when putting together a basic first aid kit:

When an accident or injury occurs you may not have much time to read a manual while trying to give first aid to an injured person. We at First Aid anywhere recommend you do a First Aid Training Course to learn what first aid challenges you may encounter and how to treat them.

Motorcycle First Aid Kit

A Motorcycle First Aid Kit has special needs:

An ordinary first aid kit just won’t cut it. This is mainly to do with size, but also the types of common injuries that bikers may experience need a different balance of first aid content.

Common injuries for motorcycle riders are:

  • Burns – sunburn and heat burns, minor and less common major, from exhaust pipes and other sources.
  • Eye injuries – things flying or blowing into the eyes.
  • Cuts, Abrasions and scrapes – usually from hitting the road literally.
  • Fractures.

When packing a Motorcycle First Aid Kit, or looking to buy one, consider kit contents that are used for stopping bleeding, treating burns, abrasions and cuts and eye injuries.

It is important to know the purpose of and how to use every item in your motorcycle first aid kit – otherwise it’s just taking up space.

Motorcycle First Aid Kit Checklist:

  • A good compact first aid book.
  • Antiseptic Wipes – 5 or 6 packet wipes.
  • Antibiotic Ointment or powder- Individual packets.
  • Anti-microbial Hand Cleaner – Water less: They make water less hand cleaners in individual packets. Bring five or six. There are small bottles of Anti-microbial gel as well.
  • Band-aids – A variety of shapes and sizes for small cuts and scrapes. We like to pack knuckle and fingertip band aids. They really work a treat and cling on well.
  • Stern-strips (Butter-fly sutures, Adhesive Sutures, Adhesive Closures) – used to pull a small gaping cut or wound together.
  • Large Combine Pads – For heavy bleeding.
  • 5 Large Sterile Gauze Pads – For bleeding. Most first aid kits do not have enough gauze or absorbent dressings to be useful in a motorcycle kit, so don’t skimp on the dressings.
  • 5 Medium Sterile Gauze – If you don’t want to carry this smaller size carry extra of the larger size and cut them down to what you need.
  • CPR Mask.
  • Emergency Blanket – These are great for retaining body heat and can be used as a reflector for rain and ground cover.
  • Normal saline 10ml vials – this doubles as an eye wash or wound cleansing.
  • Instant Cold Pack/s – These are so useful with burns, bruising, swelling and sprains. They are single use so if you have space grab a couple for your kit.
  • Burn cream or gel – Aloe Vera aids in healing, pain relief, has anti-inflammatory properties, helps prevent blistering and scarring.
  • Glow Stick – High intensity emergency glow stick for directing traffic or signalling for help.
  • Heavy Duty Zip-lock Bags – Tons of uses including removing used and contaminated gauze, gloves and dressings.
  • Latex gloves – Bring a minimum of 4 pairs.
  • Non-deodorant Feminine Pads – This is an old first aider trick. Feminine pads are highly absorbent and great for stopping heavy bleeding. Cut them in half for easy storage and usability.
  • Other medication – Pack the travel size or sample packets not the bottles. These are usually small packets that contain 2 to 4 pills. Or put the pills in small zip-lock bags and label them carefully.
    * Anti-diarrhoea tablets
    * Anti-acid
    * Antihistamine: for mild allergic reactions
    * Pain reliever
  • Triangular Bandage – For slings, padding, strapping limbs to splints when fractures are suspected.
  • Trauma shears – Go for the heavy duty pair, a size 7 1/2. You’ll need to be able to cut through leather. You won’t have time to unzip and undress if there is heavy bleeding you’ll need to cut through the leathers. I know, I know just take a deep breath and do it.
  • Curved Scissors – Scissors come in handy in many ways. Curved medical ones are great as they don’t have sharp points. In an emergency you might need to cut clothes away from an injury (not leathers this time “phew”). With sharp edges it is easy to poke through something and cause further injury when you are in a hurry or under stress.
  • Elastic and crepe bandages – a few different widths. 10cm (2″) and larger are often more versatile then smaller ones.
  • Tweezers – A good pair of tweezers has easy-to-grip handles and can be used for splinter removal and other first aid procedures. Do not bother with a cheap quality pair that do not grip splinters as you will only get frustrated. I know I have.
  • Mobile phone – most people own one these days but worth mentioning anyway.

Of course the big trick is getting all this stuff in a container small enough to actually fit on the motorcycle. Look for soft sided waterproof zipper cases. And believe it or not you should be able to get all this stuff in a bag about 20 x 13 x 8 cm (7″ x 5″ x 3″).

It can be done!

Other things to consider when putting together a Motorcycle First Aid Kit:

Consider packing these items in separate strong zip-lock bags. The reason is you will need to stuff all these items into a small bag -as mentioned above- it is very useful to use one bag for each ‘type’ of item such as gauze in one bag, medication in another and medical tools (scissors and tweezers) in another. Then when you pull out the items from the main bag they do not all tumble out and end up in a mess on the ground. This will not instill confidence in the person you might be helping.

With this packing system not only is it easier to find what you are looking for it also gets you familiar with what is in your kit, what it’s for and how to store it on your motorcycle.

Last thing, you may not have much time to read a manual while trying to give first aid to an injured person or yourself. We recommend you do a First Aid Training Course to learn what first aid challenges you may encounter and how to treat them.

Vehicle First Aid Kit :

on hand in case you are involved in or come across an accident.

Car accident injuries range from… minor injuries, such as bruises, cuts and scrapes, to moderate injuries, such as broken bones. Then there are the more serious, life-altering injuries, or even fatal injury.

We have put together a Vehicle First Aid Kit Checklist. Use it as a starting point and adapt it to your specific circumstance, needs of passengers, locations you travel to and through as well as weather conditions.

Vehicle First Aid Kit Checklist:-

  • A good First Aid Book – including basic CPR instruction.

Over the counter items:

  • Antibiotic ointment or powder.
  • Antihistamine – for mild allergic reactions.
  • Antiseptic gel (the no need for water type) – for cleaning your hands before touching open wounds.
  • Antiseptic wipes – for wiping over small wounds, cuts and scrapes.
  • Aspirin or other pain relievers – what you would normally take for pain.
  • Burn gel with Aloe Vera – Aloe Vera aids in healing, pain relief has anti-inflammatory properties helps prevent blistering and scarring.
  • Stings and bites cream – I prefer one with a local anesthetic especially for the kids.
  • Hydro-cortisone cream – for skin inflammation and rashes.


Other contents to add to a good Vehicle First Aid Kit are:-

  • CPR Mask – learn how to perform CPR before you need it for real.
  • Elastic and crepe bandages – a few different widths.
  • Gauze and non-stick dressing pads – preferably sterile.
  • Gauze squares – for either applying cream, gels or antiseptic or for putting pressure on and absorbing blood from bleeding wounds. We prefer not to use cotton balls as the fibres can get left behind in the wound and may cause trouble later. But if that is all you have go ahead and use them as they are better then nothing.
  • Triangular bandage – For slings, padding, strapping fractured limbs to splints if a fracture is suspected.
  • Adhesive tape.
  • Band aids – a variety of shapes and sizes for small cuts and scrapes.
  • Instant cold packs – The kind you snap to make it cold. These are so useful with bruising, swelling and sprains. They are single use, so if you have space grab a couple for your kit.
  • Two tongue depressors or ice block sticks for finger splints.
  • Normal saline 10ml vials for the double use as an eye wash or wound cleansing.
  • Synthetic gloves: Put in a few pairs of these.
  • Moist towelettes/wipes – for those times when you need to clean dirt or mud etc off someone or something.
  • Saline solution – for flushing wounds and eyes.
  • Sunscreen/Insect repellent – to prevent sunburn and insect bites when that picnic or football game goes just that bit longer.
  • If going on a long trip take a thermometer.
  • Torch – the shake or wind up type so you do not need batteries.
  • Tweezers – good quality ones. The cheap quality ones often do not do the job and are therefore frustrating.
  • Curved Scissors – Scissors come in handy and have many uses. Curved medical ones are great as they don’t have sharp points. In an emergency you might need to cut clothes away from an injury site and it is easy to poke through something and cause further injury when you are in a hurry or under stress.
  • Mobile phone – most people have one these days but worth mentioning.

If you have children you may need to pack:

  • Any prescription medication that your child might be taking including asthma inhalers, epi-pen or allergy medication.
  • Children’s pain reliever liquid if they have trouble swallowing tablets.
  • Children’s-strength liquid decongestant – again if they do not swallow tablets yet.

Storage container:

  • A tackle box or art-supply box works well for storing Vehicle First Aid Kit supplies. They are lightweight, strong for when it gets knocked about, have handles for easy carrying, and generally have trays or swing out sections for storing small items to keep them in order.
  • Using clip lock bags to store certain items in to categories is a great idea so things can be found in a hurry.

Other things to consider when putting together a Vehicle First Aid Kit:

If going on a long trip remember to pack in your bags any prescription medication you or other passengers are taking. Whether it be for asthma, allergies or some other aliment because a pharmacy/drug store may be quite a distance away.

When an accident or injury occurs you may not have much time to read a manual while trying to give first aid to an injured person. We recommend you do a First Aid Training Course to learn what first aid challenges you may encounter and how to treat them.

Click the below link to download the different first aid kits topics check sheet

Hiking First aid kit

Marine First aid kit

OSHA First aid kit -Mandotary


First Aid Fainting

Fainting

What is fainting?

Fainting is a sudden, brief loss of consciousness. When people faint, or pass out, they usually fall down. After they are lying down, most people will recover quickly.

The term doctors use for fainting is syncope (say “SING-kuh-pee”).

Fainting one time is usually nothing to worry about. But it is a good idea to see your doctor, because fainting could have a serious cause.

What causes fainting:

Fainting is caused by a drop in blood flow to the brain. After you lose consciousness and fall or lie down, more blood can flow to your brain so you wake up again.

The most common causes of fainting are usually not signs of a more serious illness. In these cases, you faint because of:

  • The vasovagal reflex, which causes the heart rate to slow and the blood vessels to widen, or dilate. As a result, blood pools in the lower body and less blood goes to the brain. This reflex can be triggered by many things, including stress, pain, fear, coughing, holding your breath, and urinating.
  • Orthostatic hypotension, or a sudden drop in blood pressure when you change position. This can happen if you stand up too fast, get dehydrated, or take certain medicines, such as ones for high blood pressure.

Fainting caused by the vasovagal reflex is often easy to predict. It happens to some people every time they have to get a shot or they see blood. Some people know they are going to faint because they have symptoms beforehand, such as feeling weak, nauseated, hot, or dizzy. After they wake up, they may feel confused, dizzy, or ill for a while.

Some causes of fainting can be serious. These include:

  • Heart or blood vessel problems such as a blood clot in the lungs, an abnormal heartbeat, a heart valve problem, or heart disease.
  • Nervous system problems such as seizure, stroke, or TIA.

Sometimes the cause is unknown.

When is fainting the sign of a serious problem?

Fainting may be the sign of a serious problem if:

  • It happens often in a short period of time.
  • It happens during exercise or a vigorous activity.
  • It happens without warning or if it happens when you are already lying down. (When fainting is not serious, a person often knows it is about to happen and may vomit or feel hot or queasy.)
  • You are losing a lot of blood. This could include internal bleeding that you can’t see.
  • You feel short of breath.
  • You have chest pain.
  • You feel like your heart is racing or beating unevenly (palpitations).
  • It happens along with numbness or tingling on one side of the face or body.

What exams and tests might you need?

To find the cause of fainting, a doctor will do a physical exam and ask questions about the fainting episode. You can help your doctor by being prepared to describe what happened before you fainted, how long you were “out,” and how you felt when you woke up.

Depending on what the physical exam shows, the doctor may want to do tests. These tests may include:

  • Blood tests.
  • Heart tests such as ECG, ambulatory monitoring (with a Holter monitor or event monitor, for example), echocardiogram, or an exercise stress test.
  • A tilt table test. This test checks how your body responds to changes in position.
  • Tests for nervous system problems, such as CT scan of the head, MRI of the brain, or EEG.

What should you do about fainting:

If you know you tend to faint at certain times (such as when you get a shot or have blood drawn), it may help to:

  • Sit with your head between your knees or lie down if you feel faint or have warning signs such as feeling dizzy, weak, warm, or sick to your stomach.
  • Drink plenty of fluids so you don’t get dehydrated.
  • Stand up slowly.

Fainting Symptoms

Unconsciousness is an obvious sign of fainting.

Vasovagal syncope

  • Before fainting, the person may feel light-headed and shaky and experience blurred vision.
  • The person may “see spots in front of their eyes.”
  • During this time, observers note paleness, dilated pupils, and sweating.
  • While unconscious, the person may have low pulse rate (less than 60 beats/minute).
  • The person should quickly regain consciousness.
  • Many people have no warning signs before a fainting (syncopal) episode.

Situational syncope

  • Consciousness returns when the situation is over, usually very quickly.

Postural syncope

  • Prior to the fainting episode, the person may have noted a blood loss (black stools, heavy menstrual periods) or fluid loss (vomiting, diarrhea, fever).
  • The person may have experienced light-headedness when sitting or standing.
  • Observers may note paleness, sweating, or signs of dehydration (dry lips and tongue).

Cardiac syncope

  • The person may report palpitations (awareness of pounding, fast, or abnormal heartbeat), chest pain, or shortness of breath.
  • Observers may note a weak, abnormal pulse, paleness, or sweating.
  • Fainting often occurs without warning or following exertion.

Neurologic syncope

  • The person may have a headache, loss of balance, slurred speech, double vision, or vertigo (a feeling that the room is spinning).
  • Observers note a strong pulse during the unconscious period and normal skin color.

Fainting Self-Care at Home

  • If possible, help the person who has fainted to the ground to minimize injury.
  • Stimulate the person vigorously (yelling, briskly tapping). Call emergency number immediately if the person does not respond.
  • Check for a pulse and begin CPR, if needed.
  • After the person recovers, encourage him or her to lie down until medical help arrives. Even if you believe the cause of the fainting is harmless, have the person lie down for 15-20 minutes before attempting to get up again.
  • Ask about any persistent symptoms, such as headache, back pain, chest pain, shortness of breath, abdominal pain, weakness, or loss of function, because these may indicate a life-threatening cause of the fainting.

Fainting Follow-up

  • If the cause of fainting or syncope is not determined, and the affected person is not hospitalized, he or she should see a health care practitioner within a few days. Learn to check your own pulse and teach your family members what to do in case you faint again.
  • Many people never faint again after the first time.
  • The affected individual may be referred to a heart specialist if cardiac syncope is suspected.
  • If neurologic disease is suspected during the emergency department evaluation, the person should be referred to a neurologist.

First Aid Eye Injury

Eye Injury

Eye injuries can range from the very minor, such as getting soap in one’s eye, to the catastrophic, resulting in permanent loss of vision or loss of the eye. These types of injuries often occur in the workplace, at home, in other accidents, or while participating in sports.

Eye Injuries Causes

  • Chemical exposures and burns: A chemical burn can occur in a number of ways but is most often the result of a liquid splashing into the eye. Many chemicals, such as soap, sunscreen, and even tear gas, are primarily irritants to the eye and do not usually cause permanent damage. However, acids and alkalis are highly caustic and may cause severe and permanent damage to the ocular surface.
    • Acids (such as sulfuric acid found in car batteries) or alkaline substances (such as lye found in drain cleaner and ammonia) can splash into the eyes.
    • Rubbing the eye can transfer chemicals from the skin on the hands to the eye.
    • Aerosol exposure is another method of potential chemical injury and includes such substances as Mace, tear gas, pepper spray, or hairspray.
  • Subconjunctival hemorrhage (bleeding): This is a collection of blood lying on the surface of the white of the eye (sclera). It is contained by the conjunctiva, which is the membrane that lies over the sclera. Subconjunctival hemorrhage may accompany any eye injury. The degree of subconjunctival hemorrhage is not necessarily related to the severity of the injury.
  • Corneal abrasions: The cornea is the transparent tissue that is located in front of the pupil and iris. A corneal abrasion is a scratch or a traumatic defect in the surface of the cornea. People with corneal abrasions often report that they were “poked” in the eye by a toy, a metallic object, a toddler’s fingernail, or a tree branch.
  • Traumatic iritis: This type of injury can occur in the same way as a corneal abrasion but is more often a result of a blunt blow to the eye, such as from a fist a club, or an air bag in a car. The iris is the colored part of the eye. It contains muscles that control the amount of light that enters the eye through the pupil. Iritis simply means that the iris is inflamed.
  • Hyphemas and orbital blowout fractures: These injuries are associated with significant force from a blunt object to the eye and surrounding structures. Examples would be getting hit in the face with a baseball or getting kicked in the face.
    • Hyphemas are the result of bleeding in the eye that occurs in the front part of the eye, called the anterior chamber. This is the space between the cornea and the iris. The anterior chamber is normally filled with clear fluid, called the aqueous fluid.
    • Orbital fractures are breaks of the facial bones surrounding the eye. An orbital blowout fracture is a break in the thin bone that forms the floor of the orbit and supports the eye.
    • Lacerations (cuts) to the eyelids or conjunctiva (the clear covering over the white of the eye): These injuries commonly occur from sharp objects but can also occur from a fall.
    • Lacerations to the cornea and the sclera: These injuries are very serious and are frequently associated with trauma from sharp objects.
    • Foreign bodies in the eye: Generally, a foreign body is a small piece of metal, wood, or plastic.
      • Corneal foreign bodies are embedded in the cornea and have not penetrated the eye itself. Iron containing metal foreign bodies in the cornea can cause a rusty stain in the cornea, which also requires treatment.
      • Intraorbital foreign bodies are located in the orbit (or eye socket) but have not penetrated the eye.
      • Intraocular foreign bodies are injuries in which the outer wall of the eye has been penetrated by the object.
      • Ultraviolet keratitis (or corneal flash burn): The most common light-induced trauma to the eye is ultraviolet keratitis, which can be thought of as a sunburn to the cornea. Common sources of damaging ultraviolet (UV) light arc welding arcs, tanning booths, and sunlight reflected by snow or water, especially at higher altitudes where UV rays are more intense or by light reflected by snow or water.
      • Solar retinopathy: Damage to the central part of the retina can occur by staring at the sun. Common situations that may cause this are viewing solar eclipses or drug-induced states where the person looks at the sun for an extended period of time.

Eye Injuries Symptoms and Signs

  • Chemical exposure: The most common symptoms are pain or intense burning. The eye will begin to tear profusely, may become red, and the eyelids may become swollen.
  • Subconjunctival hemorrhage (bleeding): Generally, this condition by itself is painless. Vision is not affected. The eye will have a red spot of blood on the sclera (the white part of the eye). This occurs when there is a rupture of a small blood vessel on the surface of the eye. The area of redness may be fairly large, and its appearance is sometimes alarming. Spontaneous subconjunctival hemorrhages may occur in the absence of any known trauma. If it is unassociated with other signs of trauma, it is not dangerous and generally goes away over a period of 4 to 10 days with no treatment.
  • Corneal abrasions: Symptoms include pain, a sensation that something is in the eye, tearing, and sensitivity to light.
  • Iritis: Pain and light sensitivity are common. The pain may be described as a deep ache in and around the eye. Sometimes, excessive tearing is seen.
  • Hyphema: Pain and blurred vision are the main symptoms.
  • Orbital blowout fracture: Symptoms include pain, especially with movement of the eyes; double vision that disappears when one eye is covered; and eyelid swelling which may worsen after nose blowing. Swelling around the eye and bruising often occur. A black eye is the result of blood pooling in the eyelids. This can take weeks to disappear totally.
  • Conjunctival lacerations: Symptoms include pain, redness, and a sensation that something is in the eye.
  • Lacerations to the cornea and the sclera: Symptoms include decreased vision and pain.
  • Foreign bodies:
    • Corneal: A sensation that something is in the eye, tearing, blurred vision, and light sensitivity are all common symptoms. Sometimes, the foreign body can be seen on the cornea. If the foreign body is metal, a rust ring or rust stain can occur.
    • Intraorbital: Symptoms, such as decreased vision, pain, and double vision, usually develop hours to days after the injury. Sometimes, no symptoms develop.
    • Intraocular: People may have eye pain and decreased vision, but, initially, if the foreign body is small and was introduced into the eye at high velocity, people may have no symptoms.
  • Light-induced injuries:
    • Ultraviolet keratitis: Symptoms include pain, light sensitivity, redness, and a feeling that something is in the eye. Symptoms do not appear immediately after ultraviolet exposure but rather about 4 hours later.
    • Solar retinopathy: Decreased vision with a small area of central blurring is the primary symptom.

imagesBW0YULO1

Major eye conditions

1.    Rest and reassure the patient

  • Tell the patient not to roll their eye. 
  • Help the patient to rest in the position of greatest comfort with the injured eye closed. 
  • If the eye injury is caused by a chemical splash, flush the eye with copious amounts of water. 
  • Advise the patient to avoid all movement of the head to prevent further eye damage. 
  • Reassure the patient.

Protect the injured eye:

  • Cover the injured eye with a clean eye pad or wound dressing. If there is a large foreign body lodged in the eye, DO NOT attempt to remove it, but pad around the eye socket to avoid pressure.
  • Advise the patient to keep the uninjured eye closed if possible to reduce the risk of movement of the injured eye.

imagesDD83VPYN

Arrange for medical care

  • Continue to give reassurance and encouragement to the patient.
  • While waiting for the ambulance to arrive, check the patient for any other injuries, particularly if a blow or fall was involved.
  • Check the level of consciousness and ensure that the airway is clear.
  • Remember that an injury around the eye may be associated with a head injury.

Minor eye conditions:

1.    Removal of a foreign body

  • Tell the patient not to rub the eye.  
  • Check whether the foreign material is visible on the white part of the eye. 
  • Ask the patient to blink several times to try to remove the foreign body by washing it out with tears.

If the object is not removed after several attempts, DO NOT continue because of the risk of scratching the eye surface and causing scarring.

If the foreign object cannot be seen clearly or is over the coloured part of the eye, DO NOT try to remove it.

 2.    If unsuccessful, the foreign body may not be removed by gentle flushing of the affected eye

  • Use a clean jug filled with water and pour a stream of fluid across the injured eye and into a bowl or handbasin. Pour the fluid from the mnose end of the eye toward the outer corner to avoid accidentally flushing the uninjured eye. Tilt head to injured side to aid flushing.
  • If unsuccessful, cover the eye with a clean pad and see a doctor.

imagesN86EFWNY

Snow blindness / welder’s flash:

Excessive glare (or bright light from a welder) can damage eyes. The patient may complain of severe pain in the eye(s), with a ‘gritty’ feeling. The eye may be sensitive to light and may be watery and/or red.

First Aid Drug Overdose

Drug-Overdose

The effects of any drug will vary depending on the nature of the substance, the age, weight and general health of the patient, and whether any alcohol was consumed at the same time.

Many young people are exposed to the risks of taking a ‘recreational drug’ at a party or entertainment venue, often without knowing the nature of the substance concerned. Sometimes a cocktail of drugs may be taken in the hope of enjoying a ‘high’, but this can prove to be a fatal step and seriously complicates the medical treatment required. The first aider is unable to give any specific treatment for the patient of drug abuse and can only give care following the normal priorities of basic life support.

Drug Overdose Causes

The cause of a drug overdose is either by accidental overuse or by intentional misuse. Accidental overdoses result from either a young child or an adult with impaired mental abilities swallowing a medication left within their grasp. An adult (especially elderly persons or people taking many medications) can mistakenly ingest the incorrect medication or take the wrong dose of a medication. Purposeful overdoses are for a desired effect, either to get high or to harm oneself.

  • Young children may swallow drugs by accident because of their curiosity about medications they may find. Children younger than 5 years (especially 6 months to 3 years) tend to place everything they find into their mouths. Drug overdoses in this age group are generally caused when someone accidentally leaves a medication within the child’s reach. Toddlers, when they find medications, often share them with other children. Therefore, if you suspect an overdose in one child while other children are around, those other children may have taken the medication too.
  • Adolescents and adults are more likely to overdose on one or more drugs in order to harm themselves. Attempting to harm oneself may represent a suicide attempt. People who purposefully overdose on medications frequently suffer from underlying mental health conditions. These conditions may or may not have been diagnosed before.

Drug Overdose Symptoms

Drugs have effects on the entire body. Generally, in an overdose, the effects of the drug may be a heightened level of the therapeutic effects seen with regular use. In overdose, side effects become more pronounced, and other effects can take place, which would not occur with normal use. Large overdoses of some medications cause only minimal effects, while smaller overdoses of other medications can cause severe effects, possibly death. A single dose of some medications can be lethal to a young child. Some overdoses may worsen a person’s chronic disease. For example, an asthma attack or chest pains may be triggered.

  • Problems with vital signs (temperature, pulse rate, respiratory rate, blood pressure) are possible and can be life threatening. Vital sign values can be increased, decreased, or completely absent.
  • Sleepiness, confusion, and coma are common and can be dangerous if the person breathes vomit into the lungs (aspirated).
  • Skin can be cool and sweaty, or hot and dry.
  • Chest pain is possible and can be caused by heart or lung damage. Shortness of breath may occur. Breathing may get rapid, slow, deep, or shallow.
  • Abdominal pain, nausea, vomiting, and diarrhea are possible. Vomiting blood, or blood in bowel movements, can be life threatening.
  • Specific drugs can damage specific organs, depending on the drug. Continue Reading

How you can help

1.    Assess the patient

  • Check the level of consciousness. If the patient is not fully conscious and alert, turn them onto their side and ensure they are not left alone. 

2.    Reassure the patient

  • Talk to the patient in a quiet and reassuring manner. 
  • Sometimes patients may become agitated. Enlist friends or family to calm and reassure the patient. Consider calling the police if the safety of the patient or others becomes threatened. 

3.    Identify the drug taken

  • Ask what the patient has taken, how much was taken, when it was taken, and whether it was swallowed, inhaled or injected.
  • Look for evidence that might assist the hospital staff with treatment and keep any container, syringe or needle and any vomit to aid analysis and identification. 

Some drugs create serious overheating of the body, and if this is noticed, remove unnecessary clothing to allow air to reach the skin surface to assist with cooling.

Drug Overdose Treatment:

Treatment will be dictated by the specific drug taken in the overdose. Information provided about amount, time, and underlying medical problems will be very helpful.

  • The stomach may be washed out by gastric lavage (stomach pumping) to mechanically remove unabsorbed drugs from the stomach.
  • Activated charcoal may be given to help bind drugs and keep them in the stomach and intestines. This reduces the amount absorbed into the blood. The drug, bound to the charcoal, is then expelled in the stool. Often, a cathartic is given with the charcoal so that the person more quickly evacuates stool from his or her bowels.
  • Agitated or violent people need physical restraint and sometimes sedating medications in the emergency department until the effects of the drugs wear off. This can be disturbing for a person to experience and for family members to witness. Medical professionals go to great lengths to use only as much force and as much medication as necessary. It is important to remember that whatever the medical staff does, it is to protect the person they are treating. Sometimes the person has to be intubated (have a tube placed in the airway) so that the doctor can protect the lungs or help the person breathe during the detoxification process.
  • For certain overdoses, other medicine may need to be given either to serve as an antidote to reverse the effects of what was taken or to prevent even more harm from the drug that was initially taken. The doctor will decide if treatment needs to include additional medicines

Self-Care at Home:

Home care should not be done without first consulting a doctor or poison expert.

For some accidental drug overdoses, the local poison control center may recommend home therapy and observation. Because of the potential for problems after some overdoses, syrup of ipecac or other therapies should not be given unless directed by a medical professional.

  • Most people have telephone access to a local poison control center. Locate the closest one to you through the American Association of Poison Control Centers.
  • Anyone who has small children at home should have the “poison line” telephone number readily available near the telephone.
  • People who take a drug overdose in an attempt to harm themselves generally require psychiatric intervention in addition to poison management. People who overdose for this purpose must be taken to a hospital’s Emergency Department, even if their overdose seems trivial. These people are at risk for eventually achieving a successful suicide. The sooner you intervene, the better the success of avoiding suicide.